One of the reasons why we love the “dplyr” package: it plays so well together with the forward pipe operator `%>%` from the “magrittr” package. Actually, it is not a coincidence that both packages were released quite at the same time, in 2014.
What does the pipe do? It puts the object on its left as the first argument into the function on its right: iris %>% head() is a funny way of writing head(iris). It helps to avoid long function chains like f(g(h(x))), or repeated assignments.
In 2021 and version 4.1, R has received its native forward pipe operator |> so that we can write nice code like this:
Imagine this without pipe…
Since version 4.2, the piped object can be referenced by the underscore _, but just once for now, see an example below.
To use the native pipe via CTRL-SHIFT-M in Posit/RStudio, tick this:
Combined with the many great functions from the standard distribution of R, we can get a real “dplyr” feeling without even loading dplyr. Don’t get me wrong: I am a huge fan of the whole Tidyverse! But it is a great way to learn “Standard R”.
Data chains
Here a small selection of standard functions playing well together with the pipe: They take a data frame and return a modified data frame:
subset(): Select rows and columns of data frame
transform(): Add or overwrite columns in data frame
aggregate(): Grouped calculations
rbind(), cbind(): Bind rows/columns of data frame/matrix
merge(): Join data frames by key
head(), tail(): First/last few elements of object
reshape(): Transposition/Reshaping of data frame (no, I don’t understand the interface)
R
library(ggplot2) # Need diamonds
# What does the native pipe do?
quote(diamonds |> head())
# OUTPUT
# head(diamonds)
# Grouped statistics
diamonds |>
aggregate(cbind(price, carat) ~ color, FUN = mean)
# OUTPUT
# color price carat
# 1 D 3169.954 0.6577948
# 2 E 3076.752 0.6578667
# 3 F 3724.886 0.7365385
# 4 G 3999.136 0.7711902
# 5 H 4486.669 0.9117991
# 6 I 5091.875 1.0269273
# 7 J 5323.818 1.1621368
# Join back grouped stats to relevant columns
diamonds |>
subset(select = c(price, color, carat)) |>
transform(price_per_color = ave(price, color)) |>
head()
# OUTPUT
# price color carat price_per_color
# 1 326 E 0.23 3076.752
# 2 326 E 0.21 3076.752
# 3 327 E 0.23 3076.752
# 4 334 I 0.29 5091.875
# 5 335 J 0.31 5323.818
# 6 336 J 0.24 5323.818
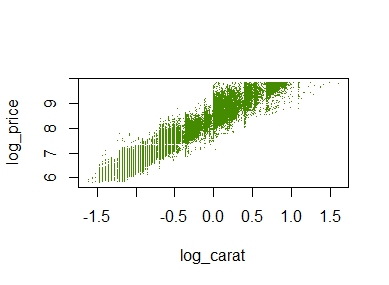
# Plot transformed values
diamonds |>
transform(
log_price = log(price),
log_carat = log(carat)
) |>
plot(log_price ~ log_carat, col = "chartreuse4", pch = ".", data = _)
A simple scatterplot
The plot does not look quite as sexy as “ggplot2”, but its a start.
Other chains
The pipe not only works perfectly with functions that modify a data frame. It also shines with many other functions often applied in a nested way. Here two examples:
R
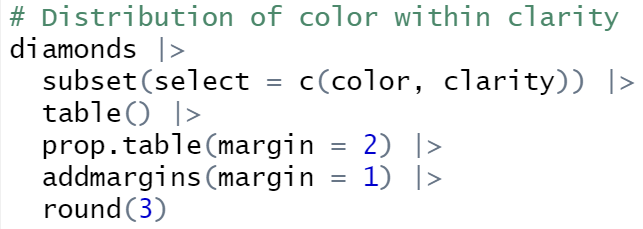
# Distribution of color within clarity
diamonds |>
subset(select = c(color, clarity)) |>
table() |>
prop.table(margin = 2) |>
addmargins(margin = 1) |>
round(3)
# OUTPUT
# clarity
# color I1 SI2 SI1 VS2 VS1 VVS2 VVS1 IF
# D 0.057 0.149 0.159 0.138 0.086 0.109 0.069 0.041
# E 0.138 0.186 0.186 0.202 0.157 0.196 0.179 0.088
# F 0.193 0.175 0.163 0.180 0.167 0.192 0.201 0.215
# G 0.202 0.168 0.151 0.191 0.263 0.285 0.273 0.380
# H 0.219 0.170 0.174 0.134 0.143 0.120 0.160 0.167
# I 0.124 0.099 0.109 0.095 0.118 0.072 0.097 0.080
# J 0.067 0.052 0.057 0.060 0.066 0.026 0.020 0.028
# Sum 1.000 1.000 1.000 1.000 1.000 1.000 1.000 1.000
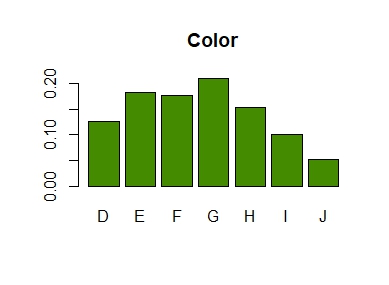
# Barplot from discrete column
diamonds$color |>
table() |>
prop.table() |>
barplot(col = "chartreuse4", main = "Color")
A linear model with complex interaction effects can be almost as opaque as a typical black-box like XGBoost.
XGBoost models are often interpreted with SHAP (Shapley Additive eXplanations): Each of e.g. 1000 randomly selected predictions is fairly decomposed into contributions of the features using the extremely fast TreeSHAP algorithm, providing a rich interpretation of the model as a whole. TreeSHAP was introduced in the Nature publication by Lundberg and Lee (2020).
Can we do the same for non-tree-based models like a complex GLM or a neural network? Yes, but we have to resort to slower model-agnostic SHAP algorithms:
“kernelshap” (Mayer and Watson) implements the Kernel SHAP algorithm by Lundberg and Lee (2017). It uses a constrained weighted regression to calculate the SHAP values of all features at the same time.
In the limit, the two algorithms provide the same SHAP values.
House prices
We will use a great dataset with 14’000 house prices sold in Miami in 2016. The dataset was kindly provided by Prof. Steven Bourassa for research purposes and can be found on OpenML.
The model
We will model house prices by a Gamma regression with log-link. The model includes factors, linear components and natural cubic splines. The relationship of living area and distance to central district is modeled by letting the spline bases of the two features interact.
Thanks to parallel processing and some implementation tricks, we were able to decompose 1000 predictions within 10 seconds! By default, kernelshap() uses exact calculations up to eight features (exact regarding the background data), which would need an infinite amount of Monte-Carlo-sampling steps.
Note that glm() has a very efficient predict() function. GAMs, neural networks, random forests etc. usually take more time, e.g. 5 minutes to do the crunching.
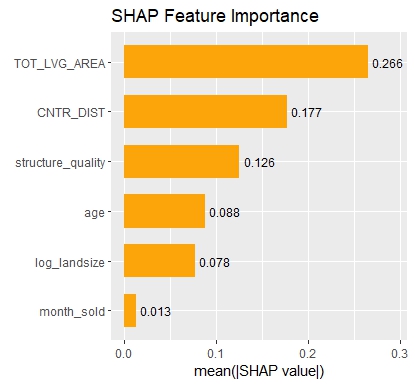
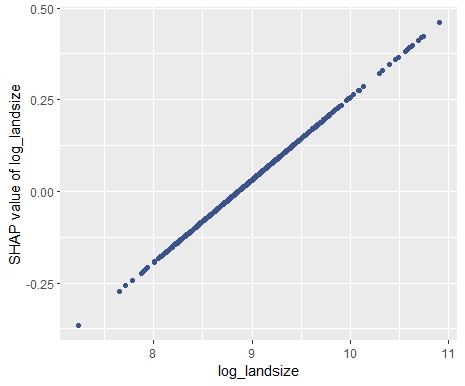
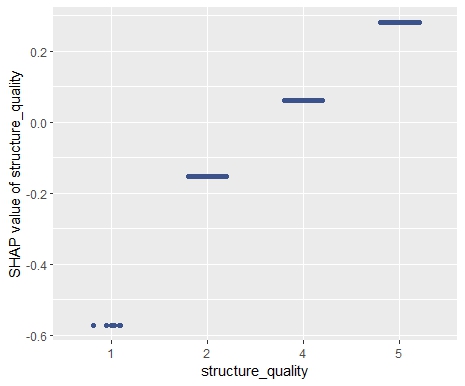
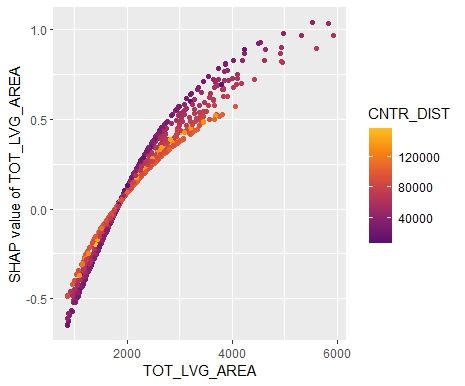
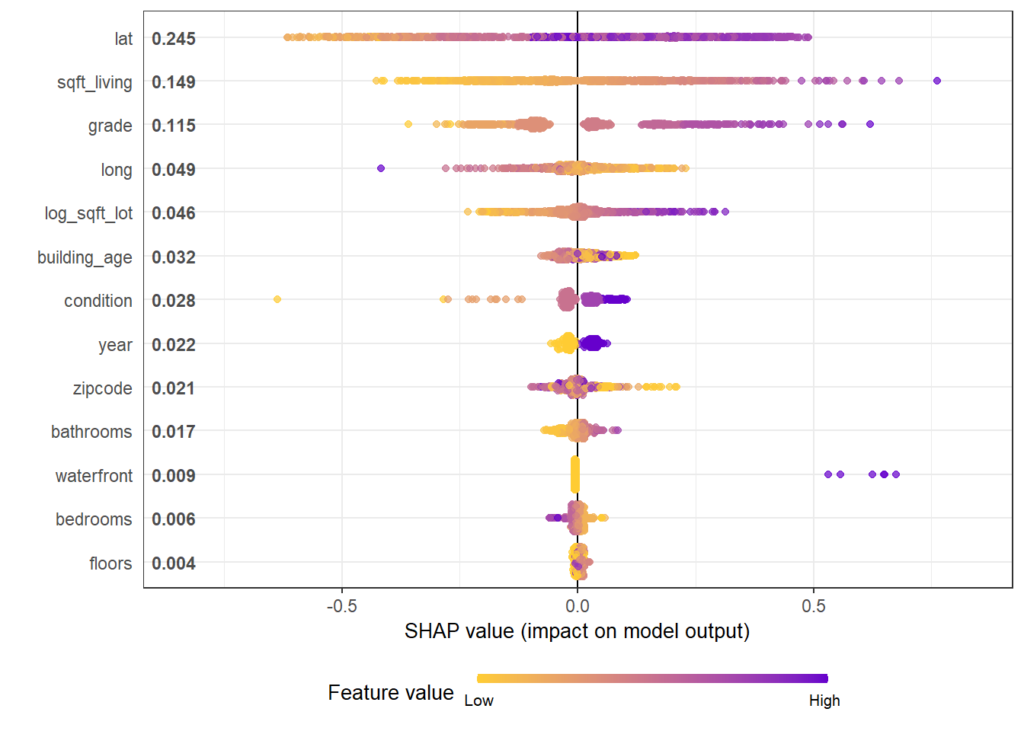
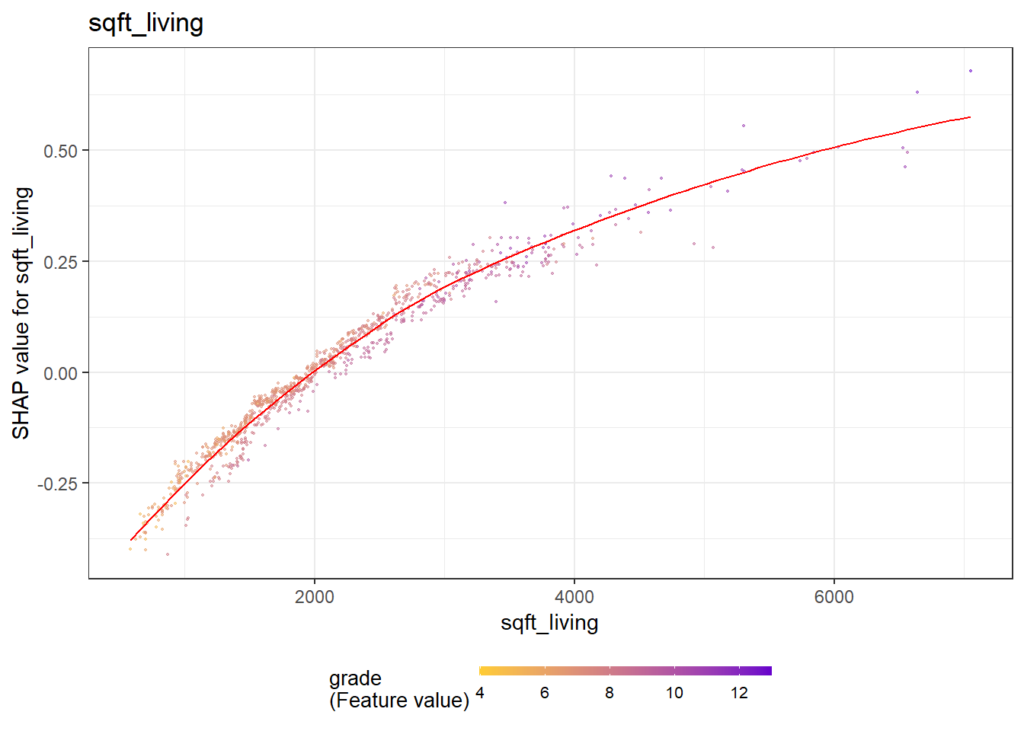
SHAP Importance: Living area and the distance to the central district are the two most important predictors. The month (within 2016) impacts the predicted prices by +-1.3% on average.SHAP dependence plot of “log_landsize”. The effect is linear. The slope 0.22559 agrees with the model coefficient.Dependence plot for “structure_quality”: The difference between structure quality 4 and 5 is 0.2184365. This equals the difference in regression coefficients.Dependence plot of “living_area”: The effect is very steep. The more central, the steeper. We cannot easily compare these numbers with the output of the linear regression.
Summary
Interpreting complex linear models with SHAP is an option. There seems to be a correspondence between regression coefficients and SHAP dependence, at least for additive components.
Kernel SHAP in R is fast. For models with slower predict() functions (e.g. GAMs, random forests, or neural nets), we often need to wait a couple of minutes.
This is the next article in our series “Lost in Translation between R and Python”. The aim of this series is to provide high-quality R and Python code to achieve some non-trivial tasks. If you are to learn R, check out the R tab below. Similarly, if you are to learn Python, the Python tab will be your friend.
Kernel SHAP
SHAP is one of the most used model interpretation technique in Machine Learning. It decomposes predictions into additive contributions of the features in a fair way. For tree-based methods, the fast TreeSHAP algorithm exists. For general models, one has to resort to computationally expensive Monte-Carlo sampling or the faster Kernel SHAP algorithm. Kernel SHAP uses a regression trick to get the SHAP values of an observation with a comparably small number of calls to the predict function of the model. Still, it is much slower than TreeSHAP.
Two good references for Kernel SHAP:
Scott M. Lundberg and Su-In Lee. A Unified Approach to Interpreting Model Predictions. Advances in Neural Information Processing Systems 30, 2017.
Ian Covert and Su-In Lee. Improving KernelSHAP: Practical Shapley Value Estimation Using Linear Regression. Proceedings of The 24th International Conference on Artificial Intelligence and Statistics, PMLR 130:3457-3465, 2021.
In our last post, we introduced our new “kernelshap” package in R. Since then, the package has been substantially improved, also by the big help of David Watson:
The package now supports multi-dimensional predictions.
It received a massive speed-up
Additionally, parallel computing can be activated for even faster calculations.
The interface has become more intuitive.
If the number of features is small (up to ten or eleven), it can provide exact Kernel SHAP values just like the reference Python implementation.
For a larger number of features, it now uses partly-exact (“hybrid”) calculations, very similar to the logic in the Python implementation.
With those changes, the R implementation is about to meet the Python version at eye level.
Example with four features
In the following, we use the diamonds data to fit a linear regression with
log(price) as response
log(carat) as numeric feature
clarity, color and cut as categorical features (internally dummy encoded)
interactions between log(carat) and the other three “C” variables. Note that the interactions are very weak
Then, we calculate SHAP decompositions for about 1000 diamonds (every 53th diamond), using 120 diamonds as background dataset. In this case, both R and Python will use exact calculations based on m=2^4 – 2 = 14 possible binary on-off vectors (a value of 1 representing a feature value picked from the original observation, a value of 0 a value picked from the background data).
R
Python
library(ggplot2)
library(kernelshap)

# Turn ordinal factors into unordered
ord <- c("clarity", "color", "cut")
diamonds[, ord] <- lapply(diamonds[ord], factor, ordered = FALSE)

# Fit model
fit <- lm(log(price) ~ log(carat) * (clarity + color + cut), data = diamonds)

# Subset of 120 diamonds used as background data
bg_X <- diamonds[seq(1, nrow(diamonds), 450), ]

# Subset of 1018 diamonds to explain
X_small <- diamonds[seq(1, nrow(diamonds), 53), c("carat", ord)]

# Exact KernelSHAP (5 seconds)
system.time(
  ks <- kernelshap(fit, X_small, bg_X = bg_X)
)
ks

# SHAP values of first 2 observations:
#          carat     clarity     color        cut
# [1,] -2.050074 -0.28048747 0.1281222 0.01587382
# [2,] -2.085838  0.04050415 0.1283010 0.03731644

# Using parallel backend
library("doFuture")

registerDoFuture()
plan(multisession, workers = 2)  # Windows
# plan(multicore, workers = 2)   # Linux, macOS, Solaris

# 3 seconds on second call
system.time(
  ks3 <- kernelshap(fit, X_small, bg_X = bg_X, parallel = TRUE)
)

# Visualization
library(shapviz)

sv <- shapviz(ks)
sv_importance(sv, "bee")
import numpy as np
import pandas as pd
from plotnine.data import diamonds
from statsmodels.formula.api import ols
from shap import KernelExplainer

# Turn categoricals into integers because, inconveniently, kernel SHAP
# requires numpy array as input
ord = ["clarity", "color", "cut"]
x = ["carat"] + ord
diamonds[ord] = diamonds[ord].apply(lambda x: x.cat.codes)
X = diamonds[x].to_numpy()

# Fit model with interactions and dummy variables
fit = ols(
  "np.log(price) ~ np.log(carat) * (C(clarity) + C(cut) + C(color))",
  data=diamonds
).fit()

# Background data (120 rows)
bg_X = X[0:len(X):450]

# Define subset of 1018 diamonds to explain
X_small = X[0:len(X):53]

# Calculate KernelSHAP values
ks = KernelExplainer(
  model=lambda X: fit.predict(pd.DataFrame(X, columns=x)),
  data = bg_X
)
sv = ks.shap_values(X_small)  # 74 seconds
sv[0:2]

# array([[-2.05007406, -0.28048747,  0.12812216,  0.01587382],
#        [-2.0858379 ,  0.04050415,  0.12830103,  0.03731644]])
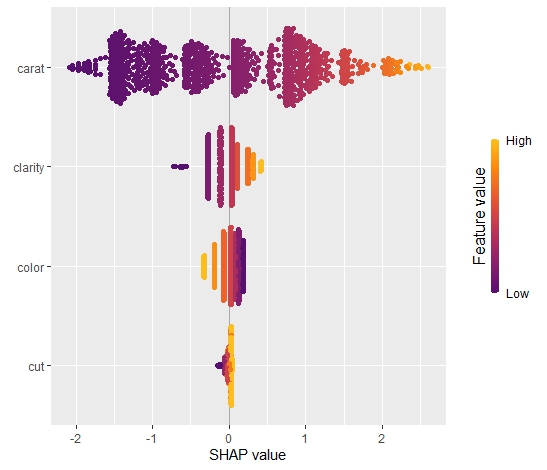
SHAP summary plot (R model)
The results match, hurray!
Example with nine features
The computation effort of running exact Kernel SHAP explodes with the number of features. For nine features, the number of relevant on-off vectors is 2^9 – 2 = 510, i.e. about 36 times larger than with four features.
We now modify above example, adding five additional features to the model. Note that the model structure is completely non-sensical. We just use it to get a feeling about what impact a 36 times larger workload has.
Besides exact calculations, we use an almost exact hybrid approach for both R and Python, using 126 on-off vectors (p*(p+1) for the exact part and 4p for the sampling part, where p is the number of features), resulting in a significant speed-up both in R and Python.
R
Python
fit <- lm(
  log(price) ~ log(carat) * (clarity + color + cut) + x + y + z + table + depth,
  data = diamonds
)

# Subset of 1018 diamonds to explain
X_small <- diamonds[seq(1, nrow(diamonds), 53), setdiff(names(diamonds), "price")]

# Exact Kernel SHAP: 61 seconds
system.time(
  ks <- kernelshap(fit, X_small, bg_X = bg_X, exact = TRUE)
)
ks
#          carat        cut     color     clarity         depth         table          x           y            z
# [1,] -1.842799 0.01424231 0.1266108 -0.27033874 -0.0007084443  0.0017787647 -0.1720782 0.001330275 -0.006445693
# [2,] -1.876709 0.03856957 0.1266546  0.03932912 -0.0004202636 -0.0004871776 -0.1739880 0.001397792 -0.006560624

# Default, using an almost exact hybrid algorithm: 17 seconds
system.time(
  ks <- kernelshap(fit, X_small, bg_X = bg_X, parallel = TRUE)
)
#          carat        cut     color     clarity         depth         table          x           y            z
# [1,] -1.842799 0.01424231 0.1266108 -0.27033874 -0.0007084443  0.0017787647 -0.1720782 0.001330275 -0.006445693
# [2,] -1.876709 0.03856957 0.1266546  0.03932912 -0.0004202636 -0.0004871776 -0.1739880 0.001397792 -0.006560624
x = ["carat"] + ord + ["table", "depth", "x", "y", "z"]
X = diamonds[x].to_numpy()

# Fit model with interactions and dummy variables
fit = ols(
  "np.log(price) ~ np.log(carat) * (C(clarity) + C(cut) + C(color)) + table + depth + x + y + z",
  data=diamonds
).fit()

# Background data (120 rows)
bg_X = X[0:len(X):450]

# Define subset of 1018 diamonds to explain
X_small = X[0:len(X):53]

# Calculate KernelSHAP values: 12 minutes
ks = KernelExplainer(
  model=lambda X: fit.predict(pd.DataFrame(X, columns=x)),
  data = bg_X
)
sv = ks.shap_values(X_small)
sv[0:2]
# array([[-1.84279897e+00, -2.70338744e-01,  1.26610769e-01,
#          1.42423108e-02,  1.77876470e-03, -7.08444295e-04,
#         -1.72078182e-01,  1.33027467e-03, -6.44569296e-03],
#        [-1.87670887e+00,  3.93291219e-02,  1.26654599e-01,
#          3.85695742e-02, -4.87177593e-04, -4.20263565e-04,
#         -1.73988040e-01,  1.39779179e-03, -6.56062359e-03]])

# Now, using a hybrid between exact and sampling: 5 minutes
sv = ks.shap_values(X_small, nsamples=126)
sv[0:2]
# array([[-1.84279897e+00, -2.70338744e-01,  1.26610769e-01,
#          1.42423108e-02,  1.77876470e-03, -7.08444295e-04,
#         -1.72078182e-01,  1.33027467e-03, -6.44569296e-03],
#        [-1.87670887e+00,  3.93291219e-02,  1.26654599e-01,
#          3.85695742e-02, -4.87177593e-04, -4.20263565e-04,
#         -1.73988040e-01,  1.39779179e-03, -6.56062359e-03]])
Again, the results are essentially the same between R and Python, but also between the hybrid algorithm and the exact algorithm. This is interesting, because the hybrid algorithm is significantly faster than the exact one.
Wrap-Up
R is catching up with Python’s superb “shap” package.
For two non-trivial linear regressions with interactions, the “kernelshap” package in R provides the same output as Python.
The hybrid between exact and sampling KernelSHAP (as implemented in Python and R) offers a very good trade-off between speed and accuracy.
Our last posts were on SHAP, one of the major ways to shed light into black-box Machine Learning models. SHAP values decompose predictions in a fair way into additive contributions from each feature. Decomposing many predictions and then analyzing the SHAP values gives a relatively quick and informative picture of the fitted model at hand.
In their 2017 paper on SHAP, Scott Lundberg and Su-In Lee presented Kernel SHAP, an algorithm to calculate SHAP values for any model with numeric predictions. Compared to Monte-Carlo sampling (e.g. implemented in R package “fastshap”), Kernel SHAP is much more efficient.
I had one problem with Kernel SHAP: I never really understood how it works!
Then I found this article by Covert and Lee (2021). The article not only explains all the details of Kernel SHAP, it also offers an version that would iterate until convergence. As a by-product, standard errors of the SHAP values can be calculated on the fly.
This article motivated me to implement the “kernelshap” package in R, complementing “shapr” that uses a different logic.
The new “kernelshap” package in R
Bleeding edge version 0.1.1 on Github: https://github.com/mayer79/kernelshap
The interface is quite simple: You need to pass three things to its main function kernelshap():
X: matrix/data.frame/tibble/data.table of observations to explain. Each column is a feature.
pred_fun: function that takes an object like X and provides one number per row.
bg_X: matrix/data.frame/tibble/data.table representing the background dataset used to calculate marginal expectation. Typically, between 100 and 200 rows.
Example
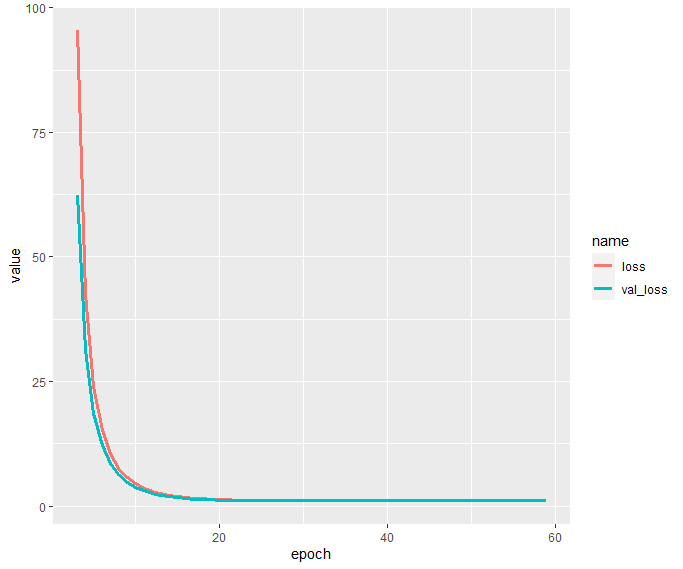
We will use Keras to build a deep learning model with 631 parameters on diamonds data. Then we decompose 500 predictions with kernelshap() and visualize them with “shapviz”.
We will fit a Gamma regression with log link the four “C” features:
carat
color
clarity
cut
R
library(tidyverse)
library(keras)

# Response and covariates
y <- as.numeric(diamonds$price)
X <- scale(data.matrix(diamonds[c("carat", "color", "cut", "clarity")]))

# Input layer: we have 4 covariates
input <- layer_input(shape = 4)

# Two hidden layers with contracting number of nodes
output <- input %>%
  layer_dense(units = 30, activation = "tanh") %>%
  layer_dense(units = 15, activation = "tanh") %>%
  layer_dense(units = 1, activation = k_exp)

# Create and compile model
nn <- keras_model(inputs = input, outputs = output)
summary(nn)

# Gamma regression loss
loss_gamma <- function(y_true, y_pred) {
  -k_log(y_true / y_pred) + y_true / y_pred
}

nn %>%
  compile(
    optimizer = optimizer_adam(learning_rate = 0.001),
    loss = loss_gamma
  )

# Callbacks
cb <- list(
  callback_early_stopping(patience = 20),
  callback_reduce_lr_on_plateau(patience = 5)
)

# Fit model
history <- nn %>%
  fit(
    x = X,
    y = y,
    epochs = 100,
    batch_size = 400,
    validation_split = 0.2,
    callbacks = cb
  )

history$metrics[c("loss", "val_loss")] %>%
  data.frame() %>%
  mutate(epoch = row_number()) %>%
  filter(epoch >= 3) %>%
  pivot_longer(cols = c("loss", "val_loss")) %>%
ggplot(aes(x = epoch, y = value, group = name, color = name)) +
  geom_line(size = 1.4)
Interpretation via KernelSHAP
In order to peak into the fitted model, we apply the Kernel SHAP algorithm to decompose 500 randomly selected diamond predictions. We use the same subset as background dataset required by the Kernel SHAP algorithm.
Afterwards, we will study
Some SHAP values and their standard errors
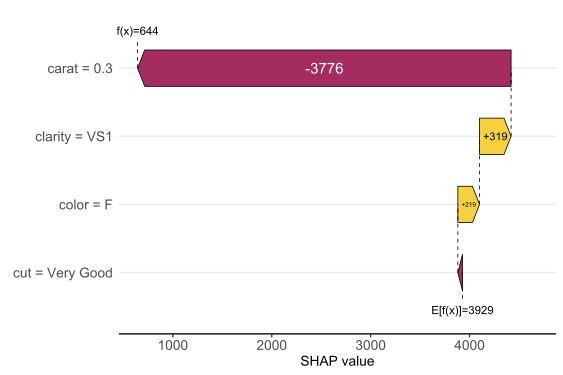
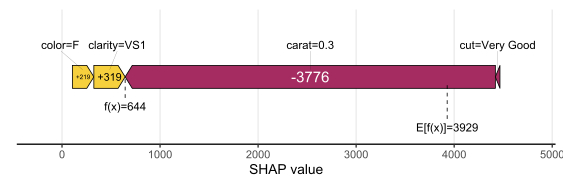
One waterfall plot
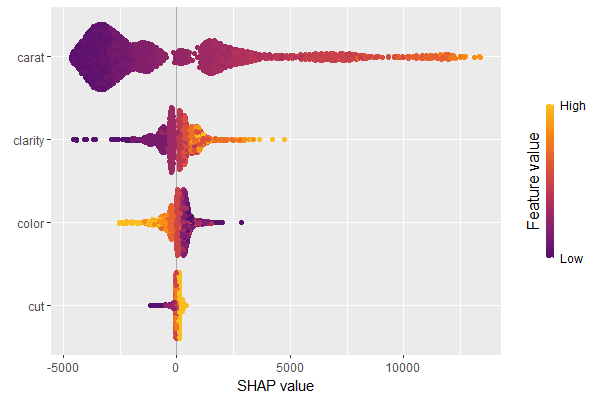
A beeswarm summary plot to get a rough picture of variable importance and the direction of the feature effects
A SHAP dependence plot for carat
R
# Interpretation on 500 randomly selected diamonds
library(kernelshap)
library(shapviz)
sample(1)
ind <- sample(nrow(X), 500)
dia_small <- X[ind, ]
# 77 seconds
system.time(
ks <- kernelshap(
dia_small,
pred_fun = function(X) as.numeric(predict(nn, X, batch_size = nrow(X))),
bg_X = dia_small
)
)
ks
# Output
# 'kernelshap' object representing
# - SHAP matrix of dimension 500 x 4
# - feature data.frame/matrix of dimension 500 x 4
# - baseline value of 3744.153
#
# SHAP values of first 2 observations:
# carat color cut clarity
# [1,] -110.738 -240.2758 5.254733 -720.3610
# [2,] 2379.065 263.3112 56.413680 452.3044
#
# Corresponding standard errors:
# carat color cut clarity
# [1,] 2.064393 0.05113337 0.1374942 2.150754
# [2,] 2.614281 0.84934844 0.9373701 0.827563
sv <- shapviz(ks, X = diamonds[ind, x])
sv_waterfall(sv, 1)
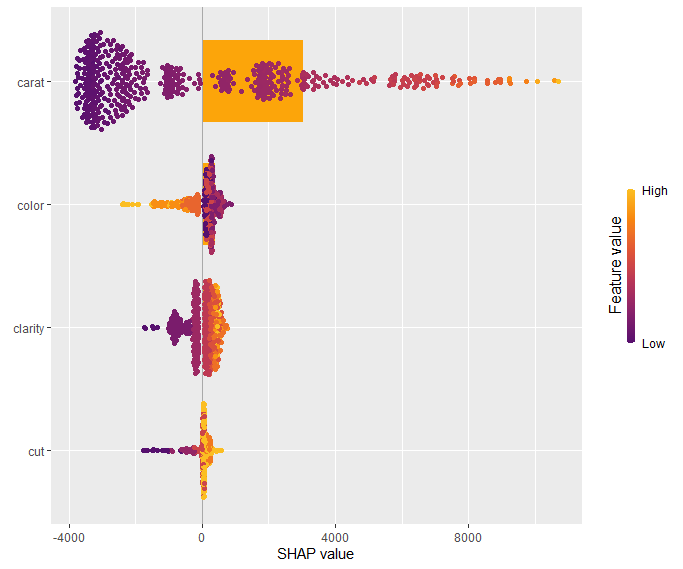
sv_importance(sv, "both")
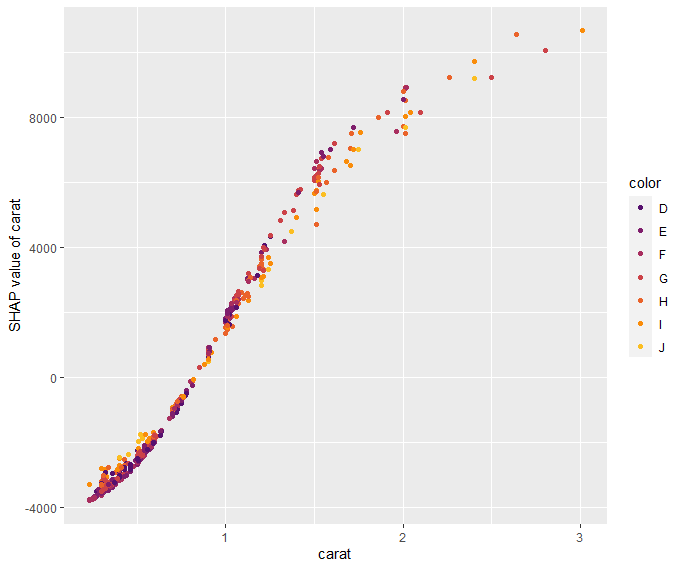
sv_dependence(sv, "carat", "auto")
Note the small standard errors of the SHAP values of the first two diamonds. They are only approximate because the background data is only a sample from an unknown population. Still, they give a good impression on the stability of the results.
The waterfall plot shows a diamond with not super nice clarity and color, pulling down the value of this diamond. Note that, even if the model is working with scaled numeric feature values, the plot shows the original feature values.
SHAP waterfall plot of one diamond. Note its bad clarity.
The SHAP summary plot shows that “carat” is, unsurprisingly, the most important variable and that high carat mean high value. “cut” is not very important, except if it is extremely bad.
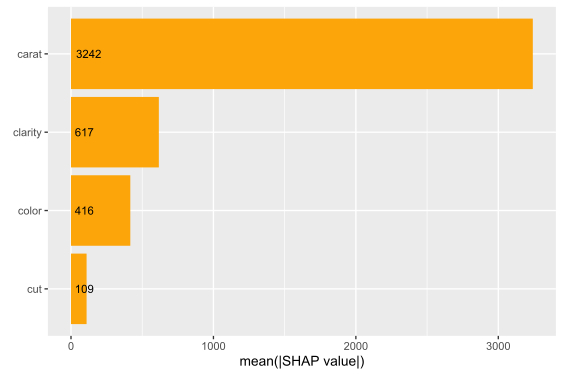
SHAP summary plot with bars representing average absolute values as measure of importance.
Our last plot is a SHAP dependence plot for “carat”: the effect makes sense, and we can spot some interaction with color. For worse colors (H-J), the effect of carat is a bit less strong as for the very white diamonds.
Dependence plot for “carat”
Short wrap-up
Standard Kernel SHAP in R, yeahhhhh 🙂
The Github version is relatively fast, so you can even decompose 500 observations of a deep learning model within 1-2 minutes.
In a recent post, I introduced the initial version of the “shapviz” package. Its motto: do one thing, but do it well: visualize SHAP values.
The initial community feedback was very positive, and a couple of things have been improved in version 0.2.0. Here the main changes:
“shapviz” now works with tree-based models of the h2o package in R.
Additionally, it wraps the shapr package, which implements an improved version of Kernel SHAP taking into account feature dependence.
A simple interface to collapse SHAP values of dummy variables was added.
The default importance plot is now a bar plot, instead of the (slower) beeswarm plot. In later releases, the latter might be moved to a separate function sv_summary() for consistency with other packages.
Importance plot and dependence plot now work neatly with ggplotly(). The other plot types cannot be translated with ggplotly() because they use geoms from outside ggplot. At least I do not know how to do this…
Example
Let’s build an H2O gradient boosted trees model to explain diamond prices. Then, we explain the model with our “shapviz” package. Note that H2O itself also offers some SHAP plots. “shapviz” is directly applied to the fitted H2O model. This means you don’t have to write a single superfluous line of code.
R
library(shapviz)
library(tidyverse)
library(h2o)
h2o.init()
set.seed(1)
# Get rid of that darn ordinals
ord <- c("clarity", "cut", "color")
diamonds[, ord] <- lapply(diamonds[, ord], factor, ordered = FALSE)
# Minimally tuned GBM with 260 trees, determined by early-stopping with CV
dia_h2o <- as.h2o(diamonds)
fit <- h2o.gbm(
c("carat", "clarity", "color", "cut"),
y = "price",
training_frame = dia_h2o,
nfolds = 5,
learn_rate = 0.05,
max_depth = 4,
ntrees = 10000,
stopping_rounds = 10,
score_each_iteration = TRUE
)
fit
# SHAP analysis on about 2000 diamonds
X_small <- diamonds %>%
filter(carat <= 2.5) %>%
sample_n(2000) %>%
as.h2o()
shp <- shapviz(fit, X_pred = X_small)
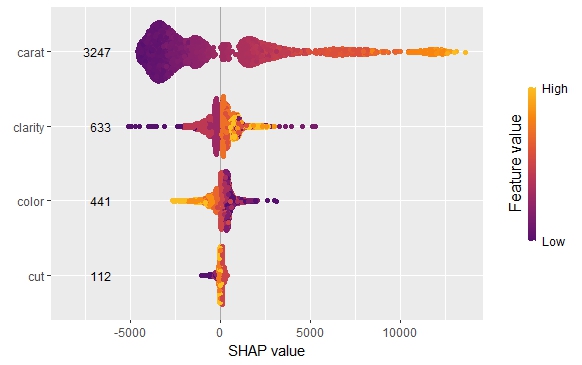
sv_importance(shp, show_numbers = TRUE)
sv_importance(shp, show_numbers = TRUE, kind = "bee")
sv_dependence(shp, "color", "auto", alpha = 0.5)
sv_force(shp, row_id = 1)
sv_waterfall(shp, row_id = 1)
Summary and importance plots
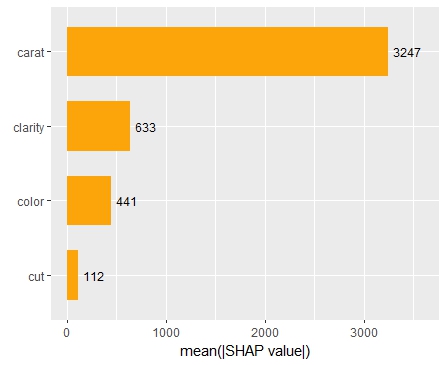
The SHAP importance and SHAP summary plots clearly show that carat is the most important variable. On average, it impacts the prediction by 3247 USD. The effect of “cut” is much smaller. Its impact on the predictions, on average, is plus or minus 112 USD.
SHAP summary plotSHAP importance plot
SHAP dependence plot
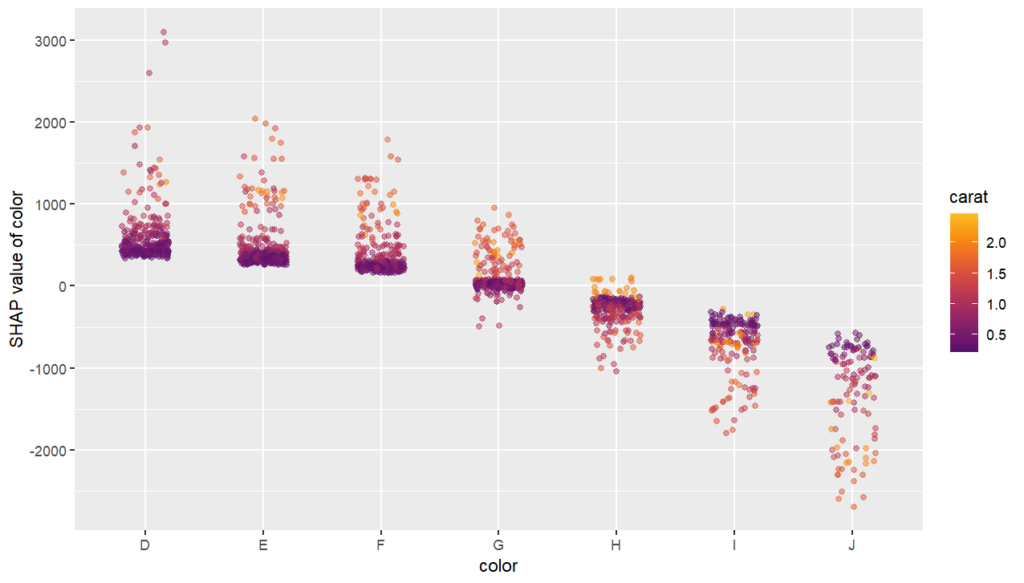
The SHAP dependence plot shows the effect of “color” on the prediction: The better the color (close to “D”), the higher the price. Using a correlation based heuristic, the plot selected carat on the color scale to show that the color effect is hightly influenced by carat in the sense that the impact of color increases with larger diamond weight. This clearly makes sense!
Dependence plot for “color”
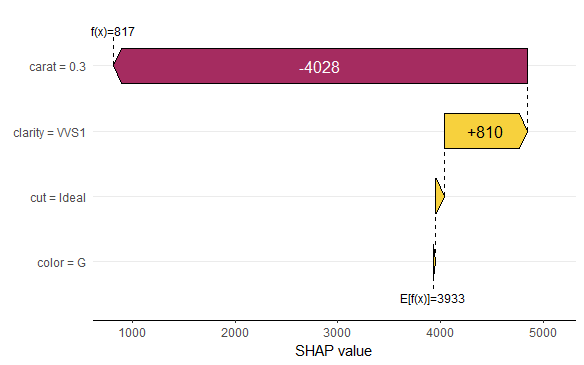
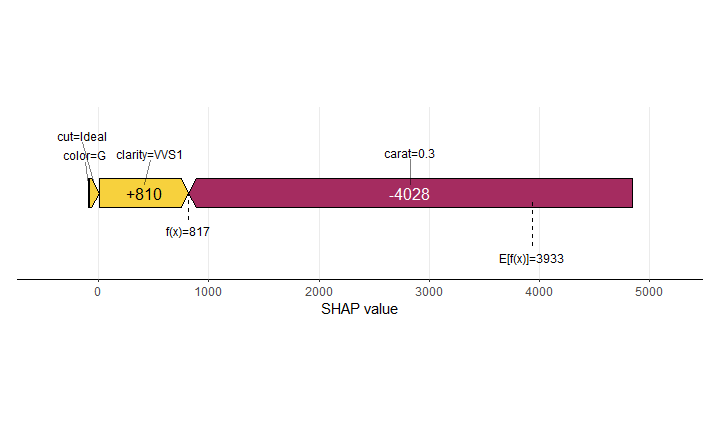
Waterfall and force plot
Finally, the waterfall and force plots show how a single prediction is decomposed into contributions from each feature. While this does not tell much about the model itself, it might be helpful to explain what SHAP values are and to debug strange predictions.
Waterfall plotForce plot
Short wrap-up
Combining “shapviz” and H2O is fun. Okay, that one was subjective :-).
Good visualization of ML models is extremely helpful and reassuring.
SHAP (SHapley Additive exPlanations, Lundberg and Lee, 2017) is an ingenious way to study black box models. SHAP values decompose – as fair as possible – predictions into additive feature contributions.
When it comes to SHAP, the Python implementation is the de-facto standard. It not only offers many SHAP algorithms, but also provides beautiful plots. In R, the situation is a bit more confusing. Different packages contain implementations of SHAP algorithms, e.g.,
some of which with great visualizations. Plus there is SHAPforxgboost (see my recent post), originally designed to visualize the results of SHAP values calculated from XGBoost, but it can also be used more generally by now.
The shapviz package
In order to entangle calculation from visualization, the shapviz package was designed. It solely focuses on visualization of SHAP values. Closely following its README, it currently provides these plots:
sv_waterfall(): Waterfall plots to study single predictions.
sv_force(): Force plots as an alternative to waterfall plots.
sv_importance(): Importance plots (bar and/or beeswarm plots) to study variable importance.
sv_dependence(): Dependence plots to study feature effects (optionally colored by heuristically strongest interacting feature).
They require a “shapviz” object, which is built from two things only:
S: Matrix of SHAP values
X: Dataset with corresponding feature values
Furthermore, a “baseline” can be passed to represent an average prediction on the scale of the SHAP values.
A key feature of the “shapviz” package is that X is used for visualization only. Thus it is perfectly fine to use factor variables, even if the underlying model would not accept these.
To further simplify the use of shapviz, direct connectors to the packages
One line of code creates a shapviz object. It contains SHAP values and feature values for the set of observations we are interested in. Note again that X is solely used as explanation dataset, not for calculating SHAP values.
In this example we construct the shapviz object directly from the fitted XGBoost model. Thus we also need to pass a corresponding prediction dataset X_pred used for calculating SHAP values by XGBoost.
R
shp <- shapviz(fit, X_pred = data.matrix(X_small), X = X_small)
Explaining one single prediction
Let’s start by explaining a single prediction by a waterfall plot or, alternatively, a force plot.
R
# Two types of visualizations
sv_waterfall(shp, row_id = 1)
sv_force(shp, row_id = 1
Waterfall plot
Factor/character variables are kept as they are, even if the underlying XGBoost model required them to be integer encoded.
Force plot
Explaining the model as a whole
We have decomposed 2000 predictions, not just one. This allows us to study variable importance at a global model level by studying average absolute SHAP values as a bar plot or by looking at beeswarm plots of SHAP values.
Beeswarm plotBar plotBeeswarm plot overlaid with bar plot
A scatterplot of SHAP values of a feature like color against its observed values gives a great impression on the feature effect on the response. Vertical scatter gives additional info on interaction effects. shapviz offers a heuristic to pick another feature on the color scale with potential strongest interaction.
R
sv_dependence(shp, v = "color", "auto")
Dependence plot with automatic interaction colorization
Summary
The “shapviz” has a single purpose: making SHAP plots.
Its interface is optimized for existing SHAP crunching packages and can easily be used in future packages as well.
All plots are highly customizable. Furthermore, they are all written with ggplot and allow corresponding modifications.
There are different R packages devoted to model agnostic interpretability, DALEX and iml being among the best known. In 2019, I added flashlight
for a couple of reasons:
Its explainers work with case weights.
Multiple explainers can be combined to a multi-explainer.
Stratified calculation is possible.
Since almost all plots in flashlight are constructed with ggplot, it is super easy to turn them into interactive plotly objects: just add a simple ggplotly() to the end of the call.
We will use a sweet dataset with more than 20’000 houses to model house prices by a set of derived features such as the logarithmic living area. The location will be represented by the postal code.
Data preparation
We first load the data and prepare some of the columns for modeling. Furthermore, we specify the set of features and the response.
Now, we are ready to inspect our two models regarding performance, variable importance, and effects.
Set up explainers
First, we pack all model dependent information into flashlights (the explainer objects) and combine them to a multiflashlight. As evaluation dataset, we pass the test data. This ensures that interpretability tools using the response (e.g., performance measures and permutation importance) are not being biased by overfitting.
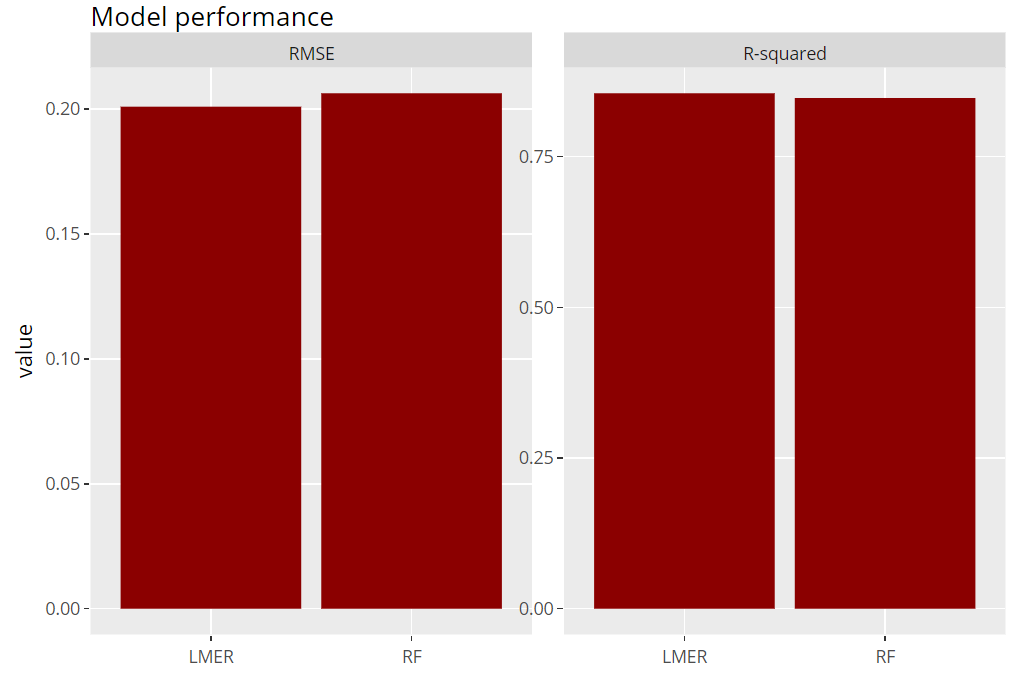
Let’s evaluate model RMSE and R-squared on the hold-out dataset. Here, the mixed-effects model performs a tiny little bit better than the random forest:
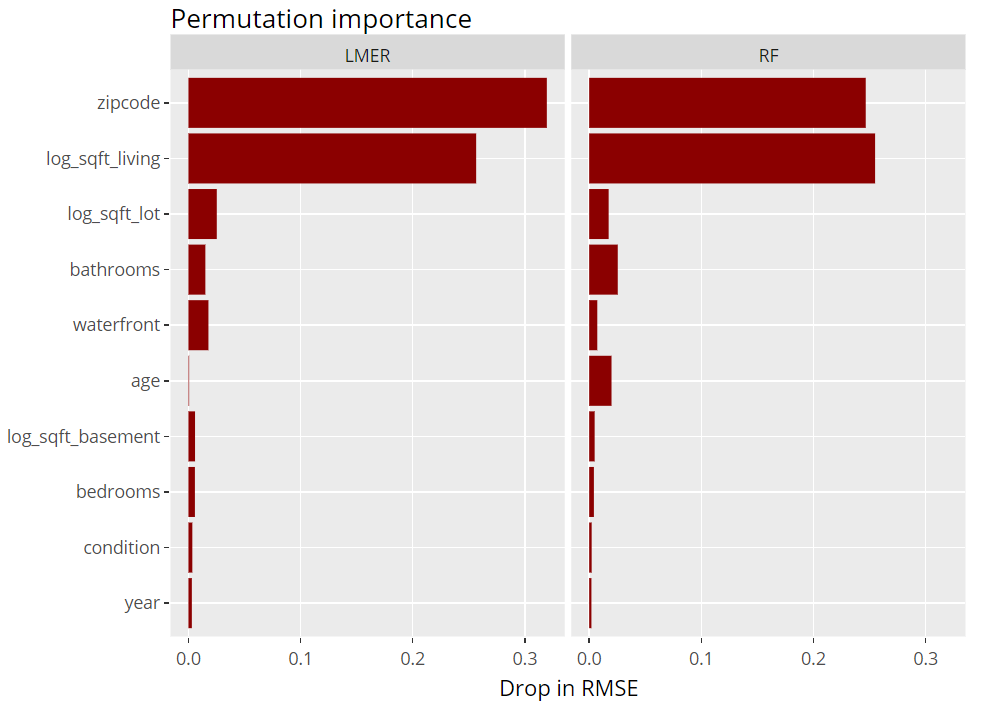
Next, we inspect the variable strength based on permutation importance. It shows by how much the RMSE is being increased when shuffling a variable before prediction. The results are quite similar between the two models.
R
(light_importance(fls, v = x) %>%
    plot(fill = "darkred") +
    labs(title = "Permutation importance", y = "Drop in RMSE")) %>%
  ggplotly()
Variable importance (png)
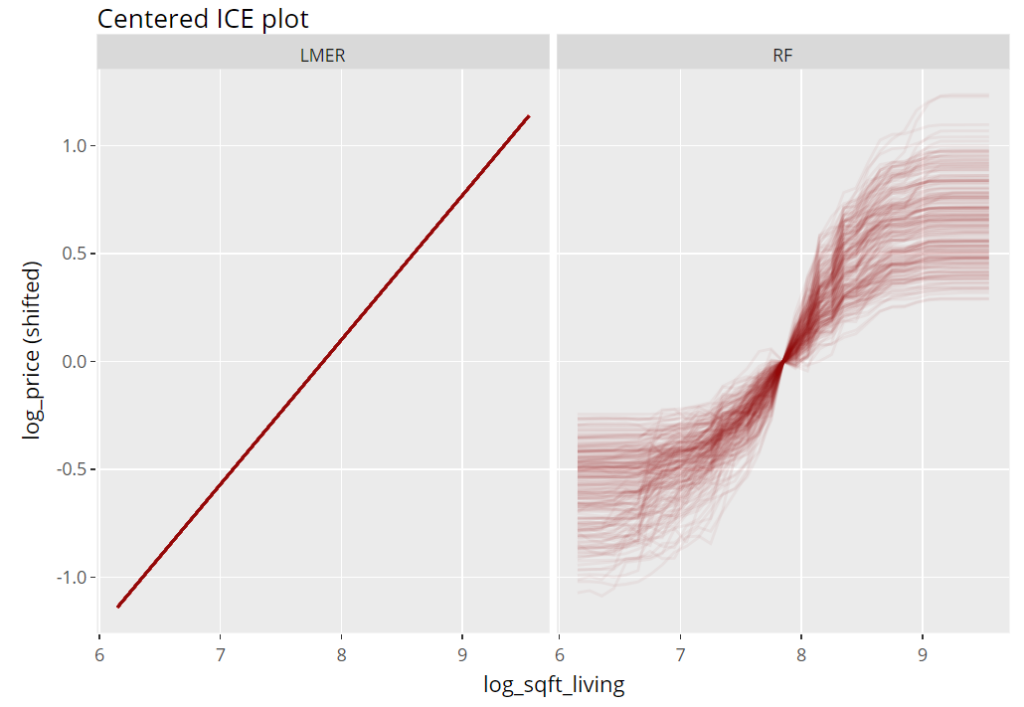
ICE plot
To get an impression of the effect of the living area, we select 200 observations and profile their predictions with increasing (log) living area, keeping everything else fixed (Ceteris Paribus). These ICE (individual conditional expectation) plots are vertically centered in order to highlight potential interaction effects. If all curves coincide, there are no interaction effects and we can say that the effect of the feature is modelled in an additive way (no surprise for the additive linear mixed-effects model).
R
(light_ice(fls, v = "log_sqft_living", n_max = 200, center = "middle") %>%
    plot(alpha = 0.05, color = "darkred") +
    labs(title = "Centered ICE plot", y = "log_price (shifted)")) %>%
  ggplotly()
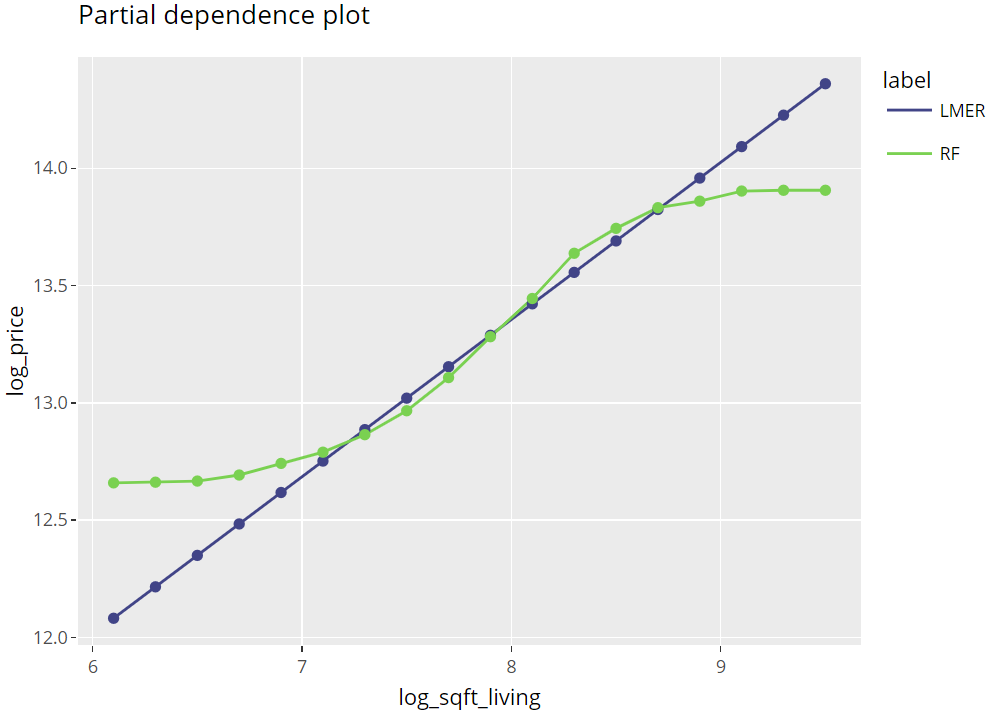
Partial dependence plots
Averaging many uncentered ICE curves provides the famous partial dependence plot, introduced in Friedman’s seminal paper on gradient boosting machines (2001).
R
(light_profile(fls, v = "log_sqft_living", n_bins = 21) %>%
    plot(rotate_x = FALSE) +
    labs(title = "Partial dependence plot", y = y) +
    scale_colour_viridis_d(begin = 0.2, end = 0.8)) %>%
  ggplotly()
Partial dependence plots (png)
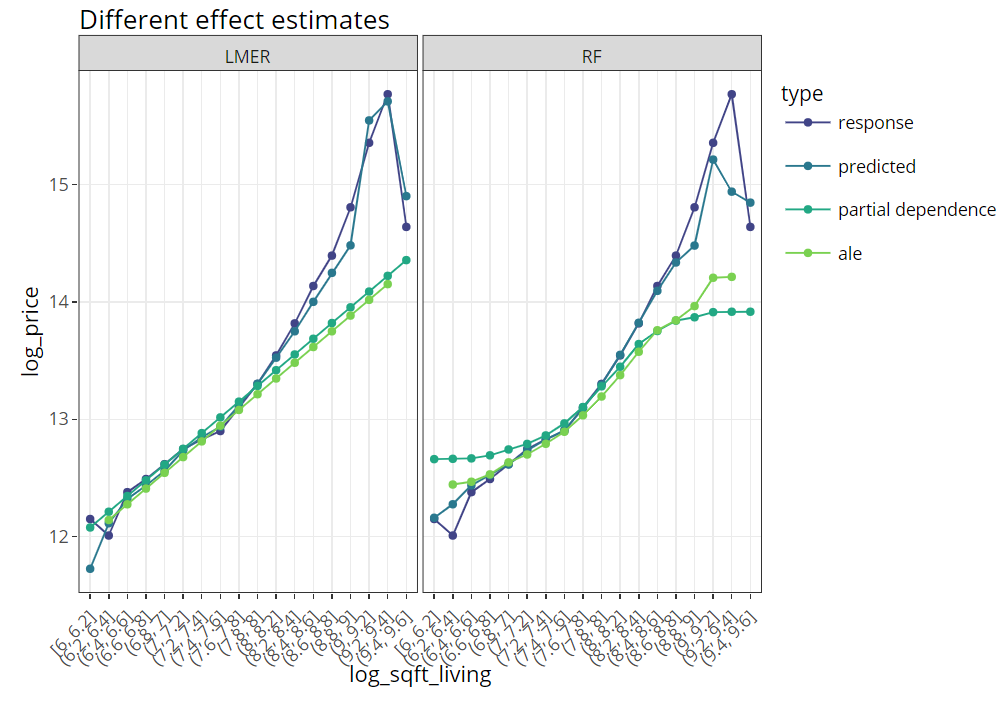
Multiple effects visualized together
The last figure extends the partial dependence plot with three additional curves, all evaluated on the hold-out dataset:
Average observed values
Average predictions
ALE plot (“accumulated local effects”, an alternative to partial dependence plots with relaxed Ceteris Paribus assumption)
R
(light_effects(fls, v = "log_sqft_living", n_bins = 21) %>%
    plot(use = "all")  +
    labs(title = "Different effect estimates", y = y) +
    scale_colour_viridis_d(begin = 0.2, end = 0.8)) %>%
  ggplotly()
This is the next article in our series “Lost in Translation between R and Python”. The aim of this series is to provide high-quality R and Python 3 code to achieve some non-trivial tasks. If you are to learn R, check out the R tab below. Similarly, if you are to learn Python, the Python tab will be your friend.
DuckDB
DuckDB is a fantastic in-process SQL database management system written completely in C++. Check its official documentation and other blogposts like this to get a feeling of its superpowers. It is getting better and better!
Some of the highlights:
Easy installation in R and Python, made possible via language bindings.
Multiprocessing and fast.
Allows to work with data bigger than RAM.
Can fire SQL queries on R and Pandas tables.
Can fire SQL queries on (multiple!) csv and/or Parquet files.
Additional packages required to run the code of this post are indicated in the code.
A first query
Let’s start by loading a dataset, initializing DuckDB and running a simple query.
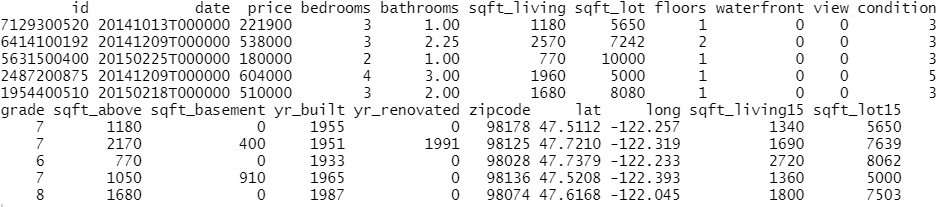
The dataset we use here contains information on over 20,000 sold houses in Kings County. Along with the sale price, different features describe the size and location of the properties. The dataset is available on OpenML.org with ID 42092.
R
Python
library(OpenML)
library(duckdb)
library(tidyverse)

# Load data
df <- getOMLDataSet(data.id = 42092)$data

# Initialize duckdb, register df and materialize first query
con = dbConnect(duckdb())
duckdb_register(con, name = "df", df = df)
con %>%
  dbSendQuery("SELECT * FROM df limit 5") %>%
  dbFetch()
import duckdb
import pandas as pd
from sklearn.datasets import fetch_openml

# Load data
df = fetch_openml(data_id=42092, as_frame=True)["frame"]

# Initialize duckdb, register df and fire first query
# If out-of-RAM: duckdb.connect("py.duckdb", config={"temp_directory": "a_directory"})
con = duckdb.connect()
con.register("df", df)
con.execute("SELECT * FROM df limit 5").fetchdf()
Result of first query (from R)
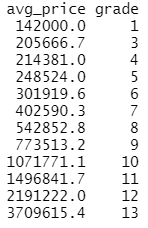
Average price per grade
If you like SQL, then you can do your data preprocessing and simple analyses with DuckDB. Here, we calculate the average house price per online grade (the higher the grade, the better the house).
R
Python
query <-
  "
  SELECT AVG(price) avg_price, grade
  FROM df
  GROUP BY grade
  ORDER BY grade
  "
avg <- con %>%
  dbSendQuery(query) %>%
  dbFetch()

avg
# Average price per grade
query = """
  SELECT AVG(price) avg_price, grade
  FROM df
  GROUP BY grade
  ORDER BY grade
  """
avg = con.execute(query).fetchdf()
avg
R output
Highlight: queries to files
The last query will be applied directly to files on disk. To demonstrate this fantastic feature, we first save “df” as a parquet file and “avg” as a csv file.
# Save df and avg to different file types
df.to_parquet("housing.parquet")  # pyarrow=7
avg.to_csv("housing_avg.csv", index=False)
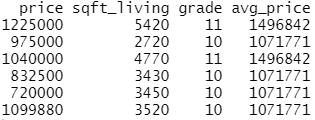
Let’s load some columns of “housing.parquet” data, but only rows with grades having an average price of one million USD. Agreed, that query does not make too much sense but I hope you get the idea…😃
R
Python
# "Complex" query
query2 <- "
  SELECT price, sqft_living, A.grade, avg_price
  FROM 'housing.parquet' A
  LEFT JOIN 'housing_avg.csv' B
  ON A.grade = B.grade
  WHERE B.avg_price > 1000000
  "

expensive_grades <- con %>%
  dbSendQuery(query2) %>%
  dbFetch()

head(expensive_grades)

# dbDisconnect(con)
# Complex query
query2 = """
  SELECT price, sqft_living, A.grade, avg_price
  FROM 'housing.parquet' A
  LEFT JOIN 'housing_avg.csv' B
  ON A.grade = B.grade
  WHERE B.avg_price > 1000000
  """
expensive_grades = con.execute(query2).fetchdf()
expensive_grades

# con.close()
R output
Last words
DuckDB is cool!
If you have strong SQL skills but do not know R or Python so well, this is a great way to get used to those programming languages.
If you are unfamiliar to SQL but like R and/or Python, you can use DuckDB for a while and end up being an SQL addict.
If your analysis involves combining many large files during preprocessing, then you can try the trick shown in the last example of this post.
It must have been around the year 2000, when I wrote my first snipped of SPLUS/R code. One thing I’ve learned back then:
Loops are slow. Replace them with
vectorized calculations or
if vectorization is not possible, use sapply() et al.
Since then, the R core team and the community has invested tons of time to improve R and also to make it faster. There are things like RCPP and parallel computing to speed up loops.
But what still relatively few R users know: loops are not that slow anymore. We want to demonstrate this using two examples.
Example 1: sqrt()
We use three ways to calculate the square root of a vector of random numbers:
Vectorized calculation. This will be the way to go because it is internally optimized in C.
A loop. This must be super slow for large vectors.
vapply() (as safe alternative to sapply).
The three approaches are then compared via bench::mark() regarding their speed for different numbers n of vector lengths. The results are then compared first regarding absolute median times, and secondly (using an independent run), on a relative scale (1 is the vectorized approach).
R
library(tidyverse)
library(bench)
# Calculate square root for each element in loop
sqrt_loop <- function(x) {
out <- numeric(length(x))
for (i in seq_along(x)) {
out[i] <- sqrt(x[i])
}
out
}
# Example
sqrt_loop(1:4) # 1.000000 1.414214 1.732051 2.000000
# Compare its performance with two alternatives
sqrt_benchmark <- function(n) {
x <- rexp(n)
mark(
vectorized = sqrt(x),
loop = sqrt_loop(x),
vapply = vapply(x, sqrt, FUN.VALUE = 0.0),
# relative = TRUE
)
}
# Combine results of multiple benchmarks and plot results
multiple_benchmarks <- function(one_bench, N) {
res <- vector("list", length(N))
for (i in seq_along(N)) {
res[[i]] <- one_bench(N[i]) %>%
mutate(n = N[i], expression = names(expression))
}
ggplot(bind_rows(res), aes(n, median, color = expression)) +
geom_point(size = 3) +
geom_line(size = 1) +
scale_x_log10() +
ggtitle(deparse1(substitute(one_bench))) +
theme(legend.position = c(0.8, 0.15))
}
# Apply simulation
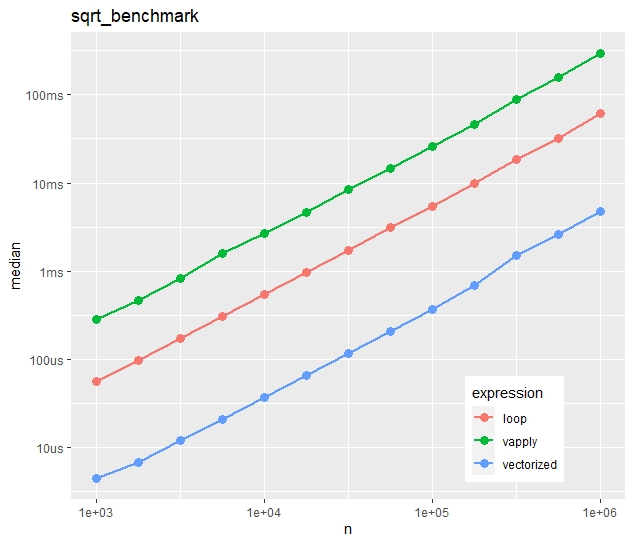
multiple_benchmarks(sqrt_benchmark, N = 10^seq(3, 6, 0.25))
Absolute timings
Absolute median times on the “sqrt()” task
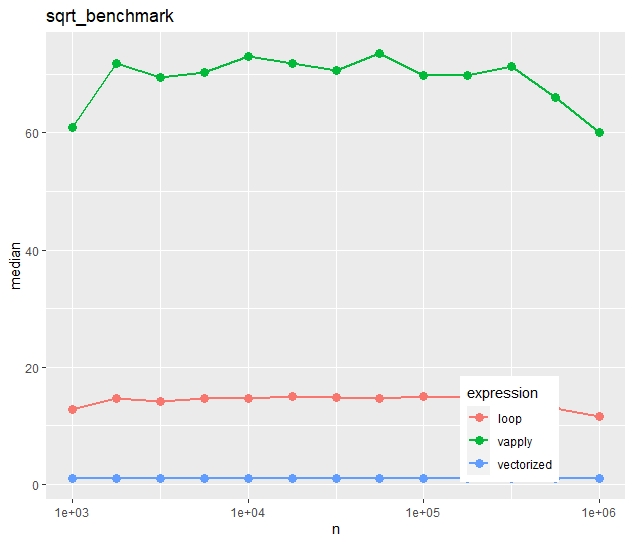
Relative timings (using a second run)
Relative median times of a separate run on the “sqrt()” task
We see:
Run times increase quite linearly with vector size.
Vectorization is more than ten times faster than the naive loop.
Most strikingly, vapply() is much slower than the naive loop. Would you have thought this?
Example 2: paste()
For the second example, we use a less simple function, namely
paste(“Number”, prettyNum(x, digits = 5))
What will our three approaches (vectorized, naive loop, vapply) show on this task?
R
pretty_paste <- function(x) {
  paste("Number", prettyNum(x, digits = 5))
}

# Example
pretty_paste(pi) # "Number 3.1416"

# Again, call pretty_paste() for each element in a loop
paste_loop <- function(x) {
  out <- character(length(x))
  for (i in seq_along(x)) {
    out[i] <- pretty_paste(x[i])
  }
  out
}

# Compare its performance with two alternatives
paste_benchmark <- function(n) {
  x <- rexp(n)
  mark(
    vectorized = pretty_paste(x),
    loop = paste_loop(x),
    vapply = vapply(x, pretty_paste, FUN.VALUE = ""),
    # relative = TRUE
  )
}

multiple_benchmarks(paste_benchmark, N = 10^seq(3, 5, 0.25))
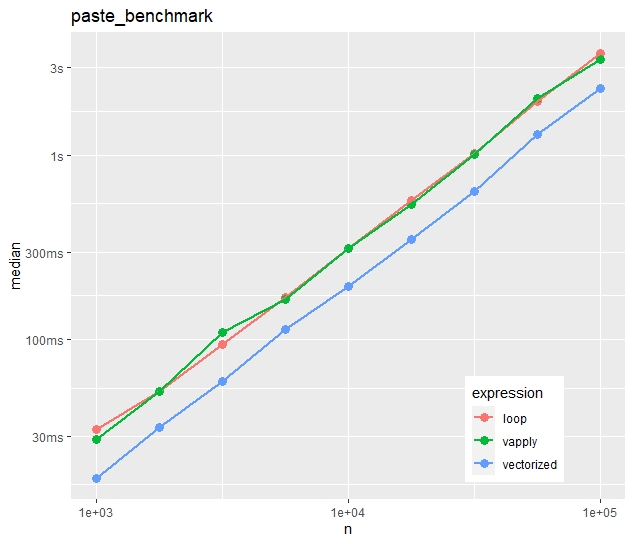
Absolute timings
Absolute median times on the “paste()” task
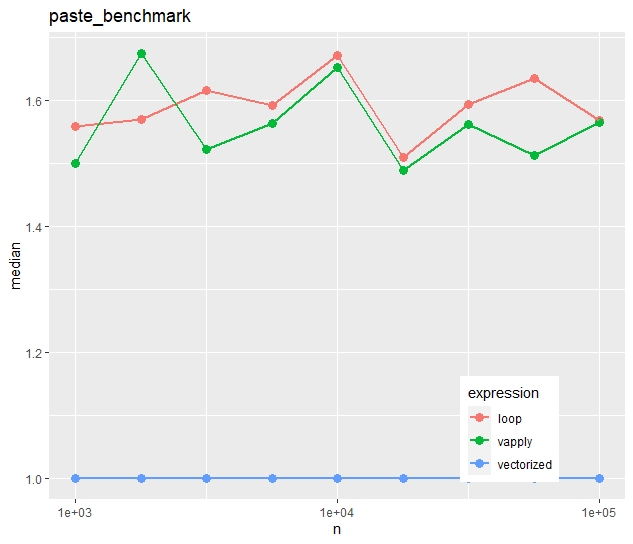
Relative timings (using a second run)
Relative median times of a separate run on the “paste()” task
In contrast to the first example, vapply() is now as fast as the naive loop.
The time advantage of the vectorized approach is much less impressive. The loop takes in median only 50% longer.
Conclusion
Vectorization is fast and easy to read. If available, use this. No surprise.
If you use vapply/sapply/lapply, do it for the style, not for the speed. In some cases, the loop will be faster. And, depending on the situation and the audience, a loop might actually be even easier to read.
Besides the many negative aspects of going through a pandemic, there are also certain positive ones like having time to write short blog posts like this.
This one picks up a topic that was intensively discussed a couple of years ago on Wolfram’s page: Namely that the damped sine wave
f(t) = t sin(t)
can be used to draw a Christmas tree. Throw in some 3D animation using the R package rgl and the tree begins to become virtual reality…
Here is our version using just ten lines of R code:
R
library(rgl)

t <- seq(0, 100, by = 0.7)^0.6
x <- t * c(sin(t), sin(t + pi))
y <- t * c(cos(t), cos(t + pi))
z <- -2 * c(t, t)
color <- rep(c("darkgreen", "gold"), each = length(t))

open3d(windowRect = c(100, 100, 600, 600), zoom = 0.9)
bg3d("black")
spheres3d(x, y, z, radius = 0.3, color = color)

# On screen (skip if export)
play3d(spin3d(axis = c(0, 0, 1), rpm = 4))

# Export (requires 3rd party tool "ImageMagick" resp. magick-package)
# movie3d(spin3d(axis = c(0, 0, 1), rpm = 4), duration = 30, dir = getwd())
Exported as gif using magick
Christian and me wish you a relaxing time over Christmas. Take care of the people you love and stay healthy and safe.
This is the next article in our series “Lost in Translation between R and Python”. The aim of this series is to provide high-quality R and Python 3 code to achieve some non-trivial tasks. If you are to learn R, check out the R tab below. Similarly, if you are to learn Python, the Python tab will be your friend.
Monotonic constraints
On ML competition platforms like Kaggle, complex and unintuitively behaving models dominate. In this respect, reality is completely different. There, the majority of models do not serve as pure prediction machines but rather as fruitful source of information. Furthermore, even if used as prediction machine, the users of the models might expect a certain degree of consistency when “playing” with input values.
A classic example are statistical house appraisal models. An additional bathroom or an additional square foot of ground area is expected to raise the appraisal, everything else being fixed (ceteris paribus). The user might lose trust in the model if the opposite happens.
One way to enforce such consistency is to monitor the signs of coefficients of a linear regression model. Another useful strategy is to impose monotonicity constraints on selected model effects.
Trees and monotonic constraints
Monotonicity constraints are especially simple to implement for decision trees. The rule is basically as follows: If a monotonicity constraint would be violated by a split on feature X, it is rejected. (Or a large penalty is subtracted from the corresponding split gain.) This will imply monotonic behavior of predictions in X, keeping all other features fixed.
Tree ensembles like boosted trees or random forests will automatically inherit this property.
Boosted trees
Most implementations of boosted trees offer monotonicity constraints. Here is a selection:
Unfortunately, the picture is completely different for random forests. At the time of writing, I am not aware of any random forest implementation in R or Python offering this useful feature.
Some options
Implement monotonic constrainted random forests from scratch.
Ask for this feature in existing implementations.
Be creative and use XGBoost to emulate random forests.
For the moment, let’s stick to option 3. In our last R <-> Python blog post, we demonstrated that XGBoost’s random forest mode works essentially as good as standard random forest implementations, at least in regression settings and using sensible defaults.
Warning: Be careful with imposing monotonicity constraints
Ask yourself: does the constraint really make sense for all possible values of other features? You will see that the answer is often “no”.
An example: If your house price model uses the features “number of rooms” and “living area”, then a monotonic constraint on “living area” might make sense (given any number of rooms), while such constraint would be non-sensical for the number of rooms. Why? Because having six rooms in a 1200 square feet home is not necessarily better than having just five rooms in an equally sized home.
Let’s try it out
We use a nice dataset containing information on over 20,000 sold houses in Kings County. Along with the sale price, different features describe the size and location of the properties. The dataset is available on OpenML.org with ID 42092.
Some rows and columns from the Kings County house dataset.
The following R and Python codes
fetch the data,
prepare the ML setting,
fit unconstrained XGBoost random forests using log sales price as response,
and visualize the effect of log ground area by individual conditional expectation (ICE) curves.
An ICE curve for variable X shows how the prediction of one specific observation changes if the value of X changes. Repeating this for multiple observations gives an idea of the effect of X. The average over multiple ICE curves produces the famous partial dependent plot.
R
Python
library(farff)
library(OpenML)
library(dplyr)
library(xgboost)
set.seed(83454)
rmse <- function(y, pred) {
sqrt(mean((y-pred)^2))
}
# Load King Country house prices dataset on OpenML
# ID 42092, https://www.openml.org/d/42092
df <- getOMLDataSet(data.id = 42092)$data
head(df)
# Prepare
df <- df %>%
mutate(
log_price = log(price),
log_sqft_lot = log(sqft_lot),
year = as.numeric(substr(date, 1, 4)),
building_age = year - yr_built,
zipcode = as.integer(as.character(zipcode))
)
# Define response and features
y <- "log_price"
x <- c("grade", "year", "building_age", "sqft_living",
"log_sqft_lot", "bedrooms", "bathrooms", "floors", "zipcode",
"lat", "long", "condition", "waterfront")
# random split
ix <- sample(nrow(df), 0.8 * nrow(df))
y_test <- df[[y]][-ix]
# Fit untuned, but good(!) XGBoost random forest
dtrain <- xgb.DMatrix(data.matrix(df[ix, x]),
label = df[ix, y])
params <- list(
objective = "reg:squarederror",
learning_rate = 1,
num_parallel_tree = 500,
subsample = 0.63,
colsample_bynode = 1/3,
reg_lambda = 0,
max_depth = 20,
min_child_weight = 2
)
system.time( # 25 s
unconstrained <- xgb.train(
params,
data = dtrain,
nrounds = 1,
verbose = 0
)
)
pred <- predict(unconstrained, data.matrix(df[-ix, x]))
# Test RMSE: 0.172
rmse(y_test, pred)
# ICE curves via our flashlight package
library(flashlight)
pred_xgb <- function(m, X) predict(m, data.matrix(X[, x]))
fl <- flashlight(
model = unconstrained,
label = "unconstrained",
data = df[ix, ],
predict_function = pred_xgb
)
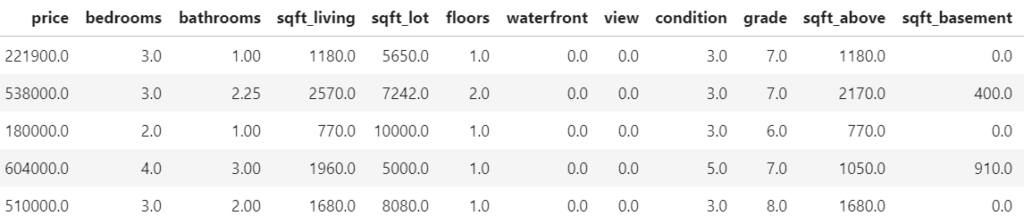
light_ice(fl, v = "log_sqft_lot", indices = 1:9,
evaluate_at = seq(7, 11, by = 0.1)) %>%
plot()
Figure 1 (R output): ICE curves of log(ground area) for the first nine observations. Many non-monotonic parts are visible.
We clearly see many non-monotonic (and in this case counterintuitive) ICE curves.
What would a model give with monotonically increasing constraint on the ground area?
R
Python
# Monotonic increasing constraint
(params$monotone_constraints <- 1 * (x == "log_sqft_lot"))
system.time( # 179s
monotonic <- xgb.train(
params,
data = dtrain,
nrounds = 1,
verbose = 0
)
)
pred <- predict(monotonic, data.matrix(df[-ix, x]))
# Test RMSE: 0.176
rmse(y_test, pred)
fl_m <- flashlight(
model = monotonic,
label = "monotonic",
data = df[ix, ],
predict_function = pred_xgb
)
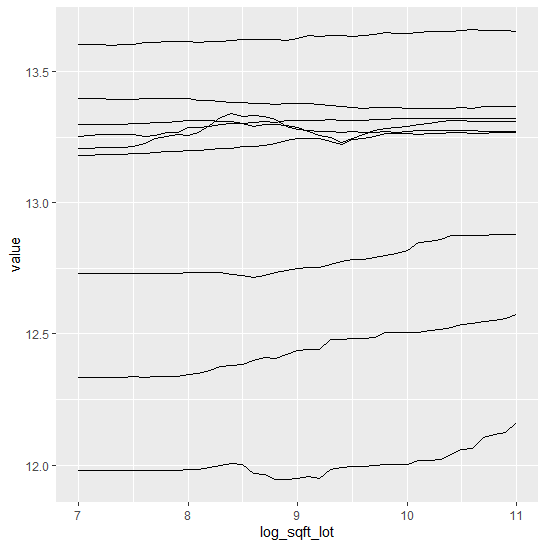
light_ice(fl_m, v = "log_sqft_lot", indices = 1:9,
evaluate_at = seq(7, 11, by = 0.1)) %>%
plot()
# One needs to pass the constraints as single string, which is rather ugly
mc = "(" + ",".join([str(int(x == "log_sqft_lot")) for x in xvars]) + ")"
print(mc)

# Modeling - wall time 49 seconds
constrained = XGBRFRegressor(monotone_constraints=mc, **param_dict)
constrained.fit(X_train, y_train)

# Test RMSE: 0.178
pred = constrained.predict(X_test)
print(f"RMSE: {mean_squared_error(y_test, pred, squared=False):.03f}")

# ICE and PDP - wall time 39 seconds
PartialDependenceDisplay.from_estimator(
    constrained,
    X=X_train,
    features=["log_sqft_lot"],
    kind="both",
    subsample=20,
    random_state=1,
)
Figure 2 (R output): ICE curves of the same observations as in Figure 1, but now with monotonic constraint. All curves are monotonically increasing.
We see:
It works! Each ICE curve in log(lot area) is monotonically increasing. This means that predictions are monotonically increasing in lot area, keeping all other feature values fixed.
The model performance is slightly worse. This is the price paid for receiving a more intuitive behaviour in an important feature.
In Python, both models take about the same time to fit (30-40 s on a 4 core i7 CPU laptop). Curiously, in R, the constrained model takes about six times longer to fit than the unconstrained one (170 s vs 30 s).
Summary
Monotonic constraints help to create intuitive models.
Unfortunately, as per now, native random forest implementations do not offer such constraints.
Using XGBoost’s random forest mode is a temporary solution until native random forest implementations add this feature.
Be careful to add too many constraints: does a constraint really make sense for all other (fixed) choices of feature values?
Recently, together with Yang Liu, we have been investing some time to extend the R package SHAPforxgboost. This package is designed to make beautiful SHAP plots for XGBoost models, using the native treeshap implementation shipped with XGBoost.
Some of the new features of SHAPforxgboost
Added support for LightGBM models, using the native treeshap implementation for LightGBM. So don’t get tricked by the package name “SHAPforxgboost” :-).
The function shap.plot.dependence() has received the option to select the heuristically strongest interacting feature on the color scale, see last section for details.
shap.plot.dependence() now allows jitter and alpha transparency.
The new function shap.importance() returns SHAP importances without plotting them.
An interesting alternative to calculate and plot SHAP values for different tree-based models is the treeshap package by Szymon Maksymiuk et al. Keep an eye on this one – it is actively being developed!
What is SHAP?
A couple of years ago, the concept of Shapely values from game theory from the 1950ies was discovered e.g. by Scott Lundberg as an interesting approach to explain predictions of ML models.
The basic idea is to decompose a prediction in a fair way into additive contributions of features. Repeating the process for many predictions provides a brilliant way to investigate the model as a whole.
The main resource on the topic is Scott Lundberg’s site. Besides this, I’d recomment to go through these two fantastic blog posts, even if you already know what SHAP values are:
As an example, we will try to model log house prices of 20’000 sold houses in Kings County. The dataset is available e.g. on OpenML.org under ID 42092.
Some rows and columns from the Kings County house dataset.
Fetch and prepare data
We start by downloading the data and preparing it for modelling.
R
library(farff)
library(OpenML)
library(dplyr)
library(xgboost)
library(ggplot2)
library(SHAPforxgboost)

# Load King Country house prices dataset on OpenML
# ID 42092, https://www.openml.org/d/42092
df <- getOMLDataSet(data.id = 42092)$data
head(df)

# Prepare
df <- df %>%
  mutate(
    log_price = log(price),
    log_sqft_lot = log(sqft_lot),
    year = as.numeric(substr(date, 1, 4)),
    building_age = year - yr_built,
    zipcode = as.integer(as.character(zipcode))
  )

# Define response and features
y <- "log_price"
x <- c("grade", "year", "building_age", "sqft_living",
       "log_sqft_lot", "bedrooms", "bathrooms", "floors", "zipcode",
       "lat", "long", "condition", "waterfront")

# random split
set.seed(83454)
ix <- sample(nrow(df), 0.8 * nrow(df))
Fit XGBoost model
Next, we fit a manually tuned XGBoost model to the data.
The resulting model consists of about 600 trees and reaches a validation RMSE of 0.16. This means that about 2/3 of the predictions are within 16% of the observed price, using the empirical rule.
Compact SHAP analysis
ML models are rarely of any use without interpreting its results, so let’s use SHAP to peak into the model.
The analysis includes a first plot with SHAP importances. Then, with decreasing importance, dependence plots are shown to get an impression on the effects of each feature.
R
# Step 1: Select some observations
X <- data.matrix(df[sample(nrow(df), 1000), x])

# Step 2: Crunch SHAP values
shap <- shap.prep(fit_xgb, X_train = X)

# Step 3: SHAP importance
shap.plot.summary(shap)

# Step 4: Loop over dependence plots in decreasing importance
for (v in shap.importance(shap, names_only = TRUE)) {
  p <- shap.plot.dependence(shap, v, color_feature = "auto",
                            alpha = 0.5, jitter_width = 0.1) +
    ggtitle(v)
  print(p)
}
Some of the plots are shown below. The code actually produces all plots, see the corresponding html output on github.
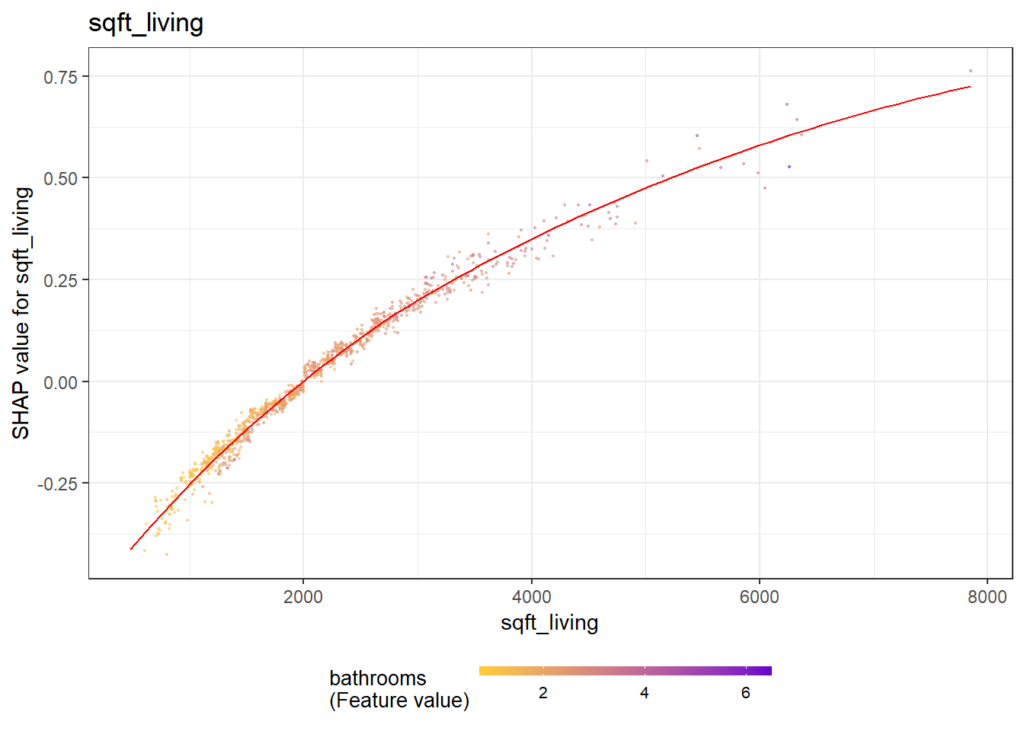
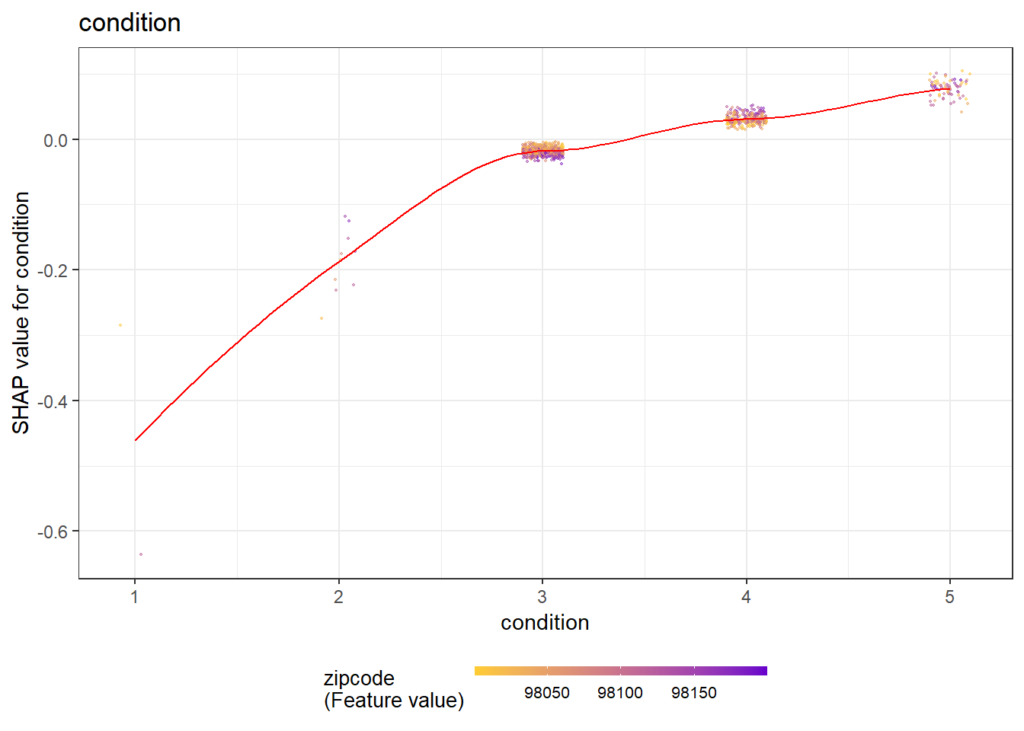
Figure 1: SHAP importance for XGBoost model. The results make intuitive sense. Location and size are among the strongest predictors.Figure 2: SHAP dependence for the second strongest predictor. The larger the living area, the higher the log price. There is not much vertical scatter, indicating that living area acts quite additively on the predictions on the log scale.Figure 3: SHAP dependence for a less important predictor. The effect of “condition” 4 vs 3 seems to depend on the zipcode (see the color). For some zipcodes, the condition does not have a big effect on the price, while for other zipcodes, the effect is clearly higher.
Same workflow for LightGBM
Let’s try out the SHAPforxgboost package with LightGBM.
Note: LightGBM Version 3.2.1 on CRAN is not working properly under Windows. This will be fixed in the next release of LightGBM. As a temporary solution, you need to build it from the current master branch.
Early stopping on the validation data selects about 900 trees as being optimal and results in a validation RMSE of also 0.16.
SHAP analysis
We use exactly the same short snippet to analyze the model by SHAP.
R
X <- data.matrix(df[sample(nrow(df), 1000), x])
shap <- shap.prep(fit_lgb, X_train = X)
shap.plot.summary(shap)

for (v in shap.importance(shap, names_only = TRUE)) {
  p <- shap.plot.dependence(shap, v, color_feature = "auto",
                            alpha = 0.5, jitter_width = 0.1) +
    ggtitle(v)
  print(p)
}
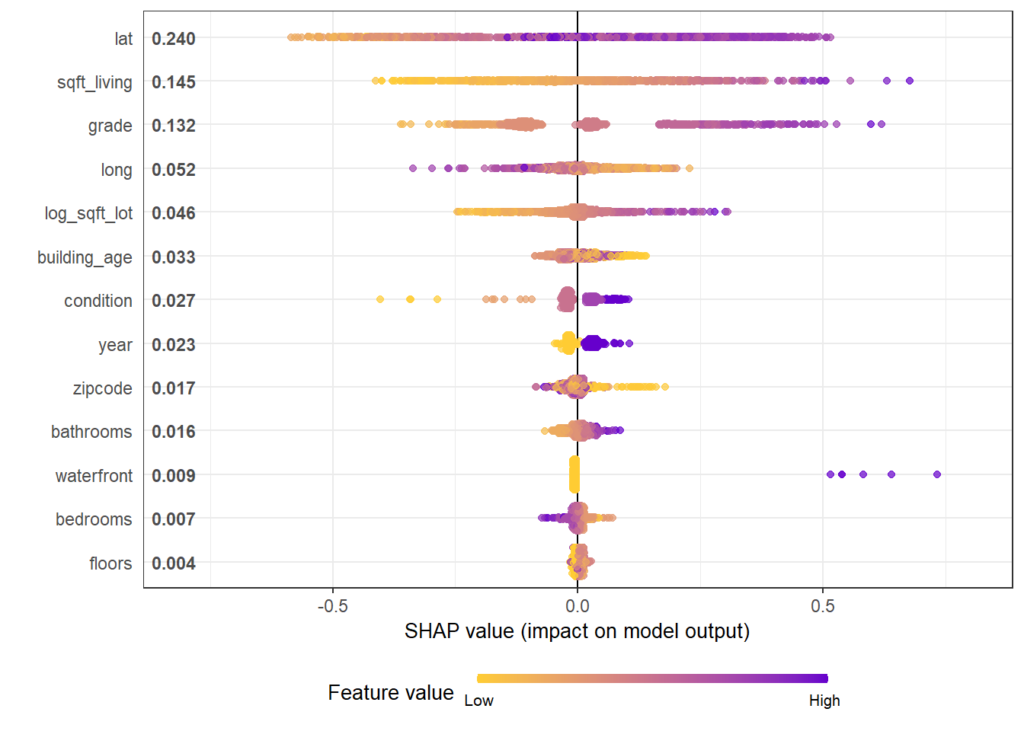
Again, we only show some of the output and refer to the html of the corresponding rmarkdown. Overall, the model seems to be very similar to the one obtained by XGBoost.
Figure 4: SHAP importance for LightGBM. By chance, the order of importance is the same as for XGBoost.Figure 5: The dependence plot for the living area also looks identical in shape than for the XGBoost model.
How does the dependence plot selects the color variable?
By default, Scott’s shap package for Python uses a statistical heuristic to colorize the points in the dependence plot by the variable with possibly strongest interaction. The heuristic used by SHAPforxgboost is slightly different and directly uses conditional variances. More specifically, the variable X on the x-axis as well as each other feature Z_k is binned into categories. Then, for each Z_k, the conditional variance across binned X and Z_k is calculated. The Z_k with the highest conditional variance is selected as the color variable.
Note that the heuristic does not depend on “shap interaction values” in order to save time (and because these would not be available for LightGBM).
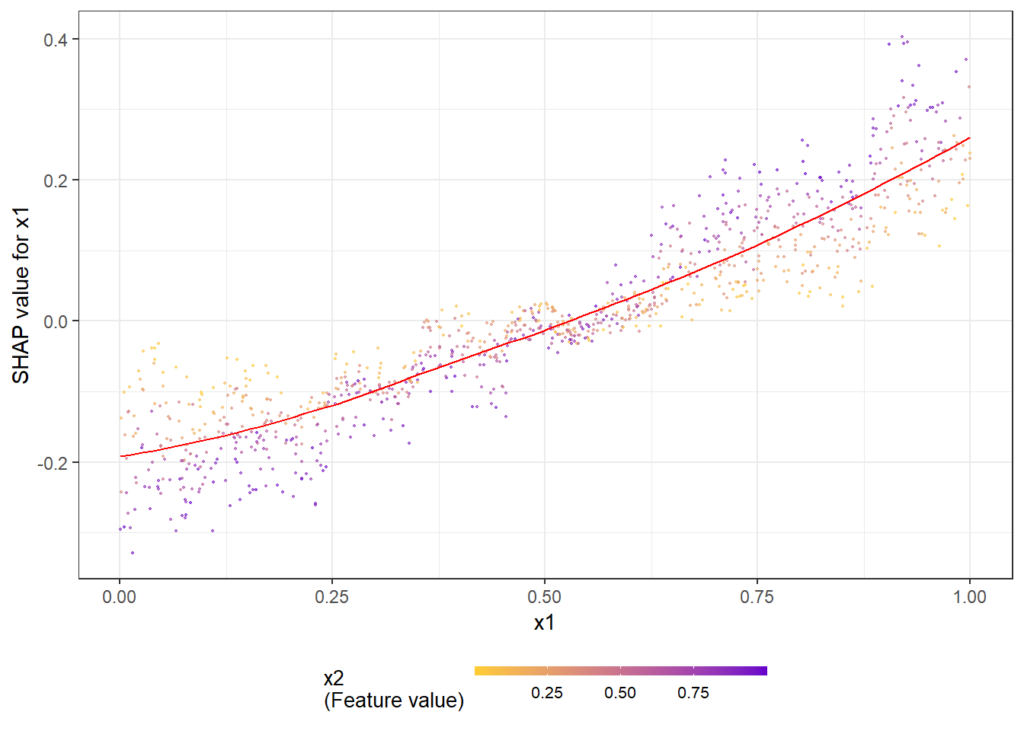
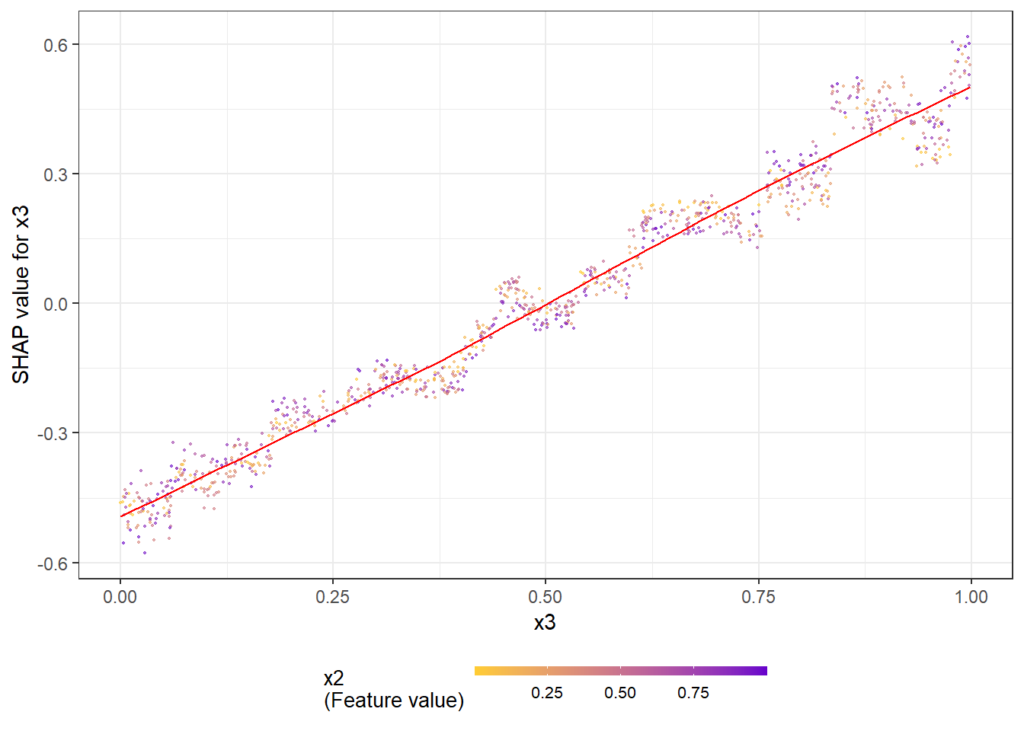
The following simple example shows how/that it is working. First, a dataset is created and a model with three features and strong interaction between x1 and x2 is being fitted. Then, we look at the dependence plots to see if it is consistent with the model/data situation.
Figure 6: The dependence plots for x1 shows a clear interaction effect with the color variable x2. This is as simulated in the data.Figure 7: The dependence plots for x3 does not show clear interaction effects, consistent with the data situation.
The full R script and rmarkdown file of this post can be found on github.
This is the next article in our series “Lost in Translation between R and Python”. The aim of this series is to provide high-quality R and Python 3 code to achieve some non-trivial tasks. If you are to learn R, check out the R tab below. Similarly, if you are to learn Python, the Python tab will be your friend.
For sure, XGBoost is well known for its excellent gradient boosting trees implementation. Although less obvious, it is no secret that it also offers a way to fit single trees in parallel, emulating random forests, see the great explanations on the official XGBoost page. Still, there seems to exist quite some confusion on how to choose certain parameters in order to get good results. It is the aim of this post to clarify this.
Also LightGBM offers a random forest mode. We will investigate it in a later post.
Why would you want to use XGBoost to fit a random forest?
Interaction & monotonic constraints are available for XGBoost, but typically not for random forest implementations. A separate post will follow to illustrate this in the random forest setting.
XGBoost can natively deal with missing values in an elegant way, unlike many random forest algorithms.
You can stick to the same data preparation pipeline.
I had additional reasons in mind, e.g. using non-standard loss functions, but this did not turn out to work well. This is possibly due to the fact that XGBoost uses a quadratic approximation to the loss, which is exact only for the mean squared error loss (MSE).
How to enable the ominous random forest mode?
Following the official explanations, we would need to set
num_parallel_tree to the number of trees in the forest,
learning_rate and num_boost_round to 1.
There are further valuable tips, e.g. to set row and column subsampling to values below one to resemble true random forests.
Still, most of the regularization parameters of XGBoost tend to favour simple trees, while the idea of a random forest is to aggregate deep, overfitted trees. These regularization parameters have to be changed as well in order to get good results.
So voila my suggestions.
Suggestions for parameters
learning_rate=1 (see above)
num_boost_round=1 (see above) Has to be set in train(), not in the parameter list. It is called nrounds in R.
subsample=0.63 A random forest draws a bootstrap sample to fit each tree. This means about 0.63 of the rows will enter one or multiple times into the model, leaving 37% out. While XGBoost does not offer such sampling with replacement, we can still introduce the necessary randomness in the dataset used to fit a tree by skipping 37% of the rows per tree.
colsample_bynode=floor(sqrt(m))/m Column subsampling per split is the main source of randomness in a random forest. A good default is usually to sample the square root of the number of features m or m/3. XGBoost offers different colsample_by* parameters, but it is important to sample per split resp. per node, not by tree. Otherwise, it might happen that important features are missing in a tree altogether, leading to overall bad predictions.
num_parallel_tree The number of trees. Native implementations of random forests usually use a default value between 100 and 500. The more, the better—but slower.
reg_lambda=0 XGBoost uses a default L2 penalty of 1! This will typically lead to shallow trees, colliding with the idea of a random forest to have deep, wiggly trees. In my experience, leaving this parameter at its default will lead to extremely bad XGBoost random forest fits. Set it to zero or a value close to zero.
max_depth=20 Random forests usually train very deep trees, while XGBoost’s default is 6. A value of 20 corresponds to the default in the h2o random forest, so let’s go for their choice.
min_child_weight=2 The default of XGBoost is 1, which tends to be slightly too greedy in random forest mode. For binary classification, you would need to set it to a value close or equal to 0.
Of course these parameters can be tuned by cross-validation, but one of the reasons to love random forests is their good performance even with default parameters.
Compared to optimized random forests, XGBoost’s random forest mode is quite slow. At the cost of performance, choose
lower max_depth,
higher min_child_weight, and/or
smaller num_parallel_tree.
Let’s try it out with regression
We will use a nice house price dataset, consisting of information on over 20,000 sold houses in Kings County. Along with the sale price, different features describe the size and location of the properties. The dataset is available on OpenML.org with ID 42092.
Some rows and columns from the Kings County house dataset.
The following R resp. Python codes fetch the data, prepare the ML setting and fit a native random forest with good defaults. In R, we use the ranger package, in Python the implementation of scikit-learn.
The response variable is the logarithmic sales price. A healthy set of 13 variables are used as features.
R
Python
library(farff)
library(OpenML)
library(dplyr)
library(ranger)
library(xgboost)

set.seed(83454)

rmse <- function(y, pred) {
  sqrt(mean((y-pred)^2))
}

# Load King Country house prices dataset on OpenML
# ID 42092, https://www.openml.org/d/42092
df <- getOMLDataSet(data.id = 42092)$data
head(df)

# Prepare
df <- df %>%
  mutate(
    log_price = log(price),
    year = as.numeric(substr(date, 1, 4)),
    building_age = year - yr_built,
    zipcode = as.integer(as.character(zipcode))
)

# Define response and features
y <- "log_price"
x <- c("grade", "year", "building_age", "sqft_living",
       "sqft_lot", "bedrooms", "bathrooms", "floors", "zipcode",
       "lat", "long", "condition", "waterfront")
m <- length(x)

# random split
ix <- sample(nrow(df), 0.8 * nrow(df))

# Fit untuned random forest
system.time( # 3 s
  fit_rf <- ranger(reformulate(x, y), data = df[ix, ])
)
y_test <- df[-ix, y]

# Test RMSE: 0.173
rmse(y_test, predict(fit_rf, df[-ix, ])$pred)
# object.size(fit_rf) # 180 MB
# Imports
import numpy as np
import pandas as pd

from sklearn.datasets import fetch_openml
from sklearn.model_selection import train_test_split
from sklearn.ensemble import RandomForestRegressor
from sklearn.metrics import mean_squared_error


def rmse(y_true, y_pred):
    return np.sqrt(mean_squared_error(y_true, y_pred))

# Fetch data from OpenML
df = fetch_openml(data_id=42092, as_frame=True)["frame"]
print("Shape: ", df.shape)
df.head()

# Prepare data
df = df.assign(
    year = lambda x: x.date.str[0:4].astype(int),
    zipcode = lambda x: x.zipcode.astype(int)
).assign(
    building_age = lambda x: x.year - x.yr_built,
)

# Feature list
xvars = [
    "grade", "year", "building_age", "sqft_living",
    "sqft_lot", "bedrooms", "bathrooms", "floors",
    "zipcode", "lat", "long", "condition", "waterfront"
]

# Data split
y_train, y_test, X_train, X_test = train_test_split(
    np.log(df["price"]), df[xvars],
    train_size=0.8, random_state=766
)

# Fit scikit-learn rf
rf = RandomForestRegressor(
    n_estimators=500,
    max_features="sqrt",
    max_depth=20,
    n_jobs=-1,
    random_state=104
)

rf.fit(X_train, y_train)  # Wall time 3 s

# Test RMSE: 0.176
print(f"RMSE: {rmse(y_test, rf.predict(X_test)):.03f}")
Both in R and Python, the test RMSE is between 0.17 and 0.18, i.e. about 2/3 of the test predictions are within 18% of the observed value. Not bad! Note: The test performance depends on the split seed, so it does not make sense to directly compare the R and Python performance.
With XGBoost’s random forest mode
Now let’s try to reach the same performance with XGBoost’s random forest implementation using the above parameter suggestions.
The performance of the XGBoost random forest is essentially as good as the native random forest implementations. And all this without any parameter tuning!
XGBoost is much slower than the optimized random forest implementations. If this is a problem, e.g. reduce the tree depth. In this example, Python takes almost twice as much time as R. No idea why! The timings were made on a usual 4 core i7 processor.
Disk space required to store the model objects is comparable between XGBoost and native random forest implementations.
What if you would run the same model with XGBoost defaults?
With default reg_lambda=1: The performance would end up at a catastrophic RMSE of 0.35!
With default max_depth=6: The RMSE would be much worse (0.23) as well.
With colsample_bytree instead of colsample_bynode: The RMSE would deteriorate to 0.27.
Thus: It is essential to set some values to a good “random forest” default!
Does it always work that good?
Definitively not in classification settings. However, in regression settings with the MSE loss, XGBoost’s random forest mode is often as accurate as native implementations.
Classification models In my experience, the XGBoost random forest mode does not work as good as a native random forest for classification, possibly due to the fact that it uses only an approximation to the loss function.
Other regression examples Using the setting of our last “R <–> Python” post (diamond duplicates and grouped sampling) and the same parameters as above, we get the following test RMSEs: With ranger (R code in link below): 0.1043, with XGBoost: 0.1042. Sweet!
Wrap up
With the right default parameters, XGBoost’s random forest mode reaches similar performance on regression problems than native random forest packages. Without any tuning!
For losses other than MSE, it does not work so well.
This is the next article in our series “Lost in Translation between R and Python”. The aim of this series is to provide high-quality R and Python 3 code to achieve some non-trivial tasks. If you are to learn R, check out the R tab below. Similarly, if you are to learn Python, the Python tab will be your friend.
Question: How many times did you use diamonds data to compare regression techniques like random forests and gradient boosting?
Answer: Probably a lot!
The curious fact
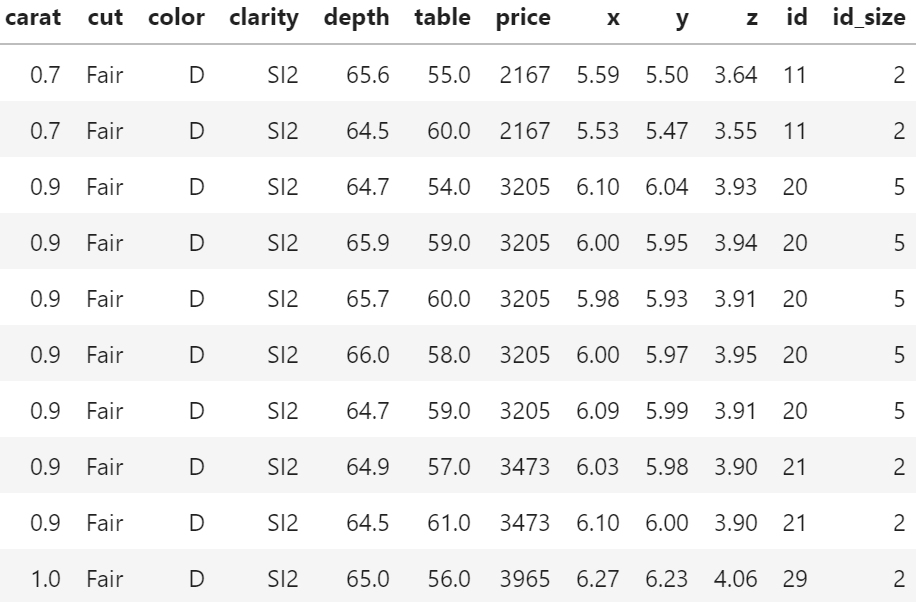
We recently stumbled over a curious fact regarding that dataset. 26% of the diamonds are duplicates regarding price and the four “C” variables. Within duplicates, the perspective variables table, depth, x, y, and z would differ as if a diamond had been measured from different angles.
In order to illustrate the issue, let us add the two auxilary variables
id: group id of diamonds with identical price and four “C”, and
id_size: number of rows in that id
to the dataset and consider a couple of examples. You can view both R and Python code – but the specific output will differ because language specific naming of group ids.
R
Python
library(tidyverse)

# We add group id and its size
dia <- diamonds %>%
  group_by(carat, cut, clarity, color, price) %>%
  mutate(id = cur_group_id(),
         id_size = n()) %>%
  ungroup() %>%
  arrange(id)

# Proportion of duplicates
1 - max(dia$id) / nrow(dia)  # 0.26

# Some examples
dia %>%
  filter(id_size > 1) %>%
  head(10)

# Most frequent
dia %>%
  arrange(-id_size) %>%
  head(.$id_size[1])

# A random large diamond appearing multiple times
dia %>%
  filter(id_size > 3) %>%
  arrange(-carat) %>%
  head(.$id_size[1])
import numpy as np
import pandas as pd
from plotnine.data import diamonds
# Variable groups
cat_vars = ["cut", "color", "clarity"]
xvars = cat_vars + ["carat"]
all_vars = xvars + ["price"]
print("Shape: ", diamonds.shape)
# Add id and id_size
df = diamonds.copy()
df["id"] = df.groupby(all_vars).ngroup()
df["id_size"] = df.groupby(all_vars)["price"].transform(len)
df.sort_values("id", inplace=True)
print(f'Proportion of dupes: {1 - df["id"].max() / df.shape[0]:.0%}')
print("Random examples")
print(df[df.id_size > 1].head(10))
print("Most frequent")
print(df.sort_values(["id_size", "id"]).tail(13))
print("A random large diamond appearing multiple times")
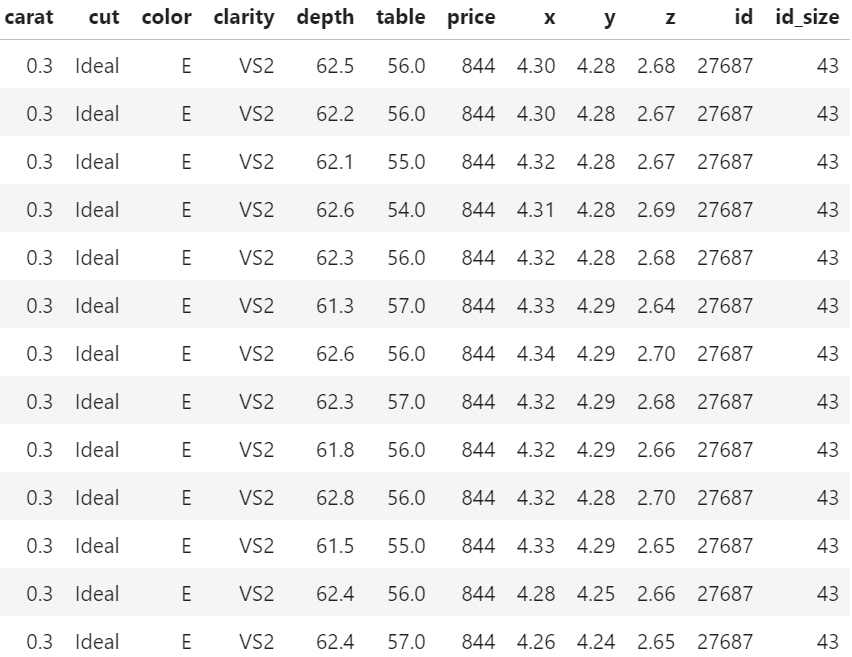
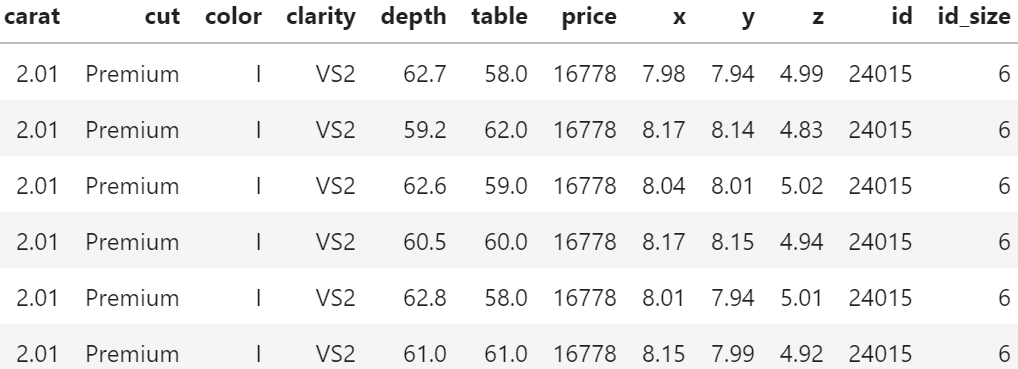
df[df.id_size > 3].sort_values("carat").tail(6)
Table 1: Some duplicates in the four “C” variables and price (Python output).Table 2: One of the two(!) diamonds appearing a whopping 43 times (Python output).Table 3: A large, 2.01 carat diamond appears six times (Python output).
Of course, having the same id does not necessarily mean that the rows really describe the same diamond. price and the four “C”s could coincide purely by chance. Nevertheless: there are exactly six diamonds of 2.01 carat and a price of 16,778 USD in the dataset. And they all have the same color, cut and clarity. This cannot be coincidence!
Why would this be problematic?
In the presence of grouped data, standard validation techniques tend to reward overfitting.
This becomes immediately clear having in mind the 2.01 carat diamond from Table 3. Standard cross-validation (CV) uses random or stratified sampling and would scatter the six rows of that diamond across multiple CV folds. Highly flexible algorithms like random forests or nearest-neighbour regression could exploit this by memorizing the price of this diamond in-fold and do very well out-of-fold. As a consequence, the stated CV performance would be too good and the choice of the modeling technique and its hyperparameters suboptimal.
With grouped data, a good approach is often to randomly sample the whole group instead of single rows. Using such grouped splitting ensures that all rows in the same group would end up in the same fold, removing the above described tendency to overfit.
Note 1. In our case of duplicates, a simple alternative to grouped splitting would be to remove the duplicates altogether. However, the occurrence of duplicates is just one of many situations where grouped or clustered samples appear in reality.
Note 2. The same considerations not only apply to cross-validation but also to simple train/validation/test splits.
Evaluation
What does this mean regarding our diamonds dataset? Using five-fold CV, we will estimate the true root-mean-squared error (RMSE) of a random forest predicting log price by the four “C”. We run this experiment twice: one time, we create the folds by random splitting and the other time by grouped splitting. How heavily will the results from random splitting be biased?
R
Python
library(ranger)
library(splitTools) # one of our packages on CRAN

set.seed(8325)

# We model log(price)
dia <- dia %>%
  mutate(y = log(price))

# Helper function: calculate rmse
rmse <- function(obs, pred) {
  sqrt(mean((obs - pred)^2))
}

# Helper function: fit model on one fold and evaluate
fit_on_fold <- function(fold, data) {
  fit <- ranger(y ~ carat + cut + color + clarity, data = data[fold, ])
  rmse(data$y[-fold], predict(fit, data[-fold, ])$pred)
}

# 5-fold CV for different split types
cross_validate <- function(type, data) {
  folds <- create_folds(data$id, k = 5, type = type)
  mean(sapply(folds, fit_on_fold, data = dia))
}

# Apply and plot
(results <- sapply(c("basic", "grouped"), cross_validate, data = dia))
barplot(results, col = "orange", ylab = "RMSE by 5-fold CV")
from sklearn.ensemble import RandomForestRegressor
from sklearn.model_selection import cross_val_score, GroupKFold, KFold
from sklearn.metrics import make_scorer, mean_squared_error
import seaborn as sns

rmse = make_scorer(mean_squared_error, squared=False)

# Prepare y, X
df = df.sample(frac=1, random_state=6345)
y = np.log(df.price)
X = df[xvars].copy()

# Correctly ordered integer encoding
X[cat_vars] = X[cat_vars].apply(lambda x: x.cat.codes)

# Cross-validation
results = {}
rf = RandomForestRegressor(n_estimators=500, max_features="sqrt",
                           min_samples_leaf=5, n_jobs=-1)
for nm, strategy in zip(("basic", "grouped"), (KFold, GroupKFold)):
    results[nm] = cross_val_score(
        rf, X, y, cv=strategy(), scoring=rmse, groups=df.id
    ).mean()
print(results)

res = pd.DataFrame(results.items())
sns.barplot(x=0, y=1, data=res);
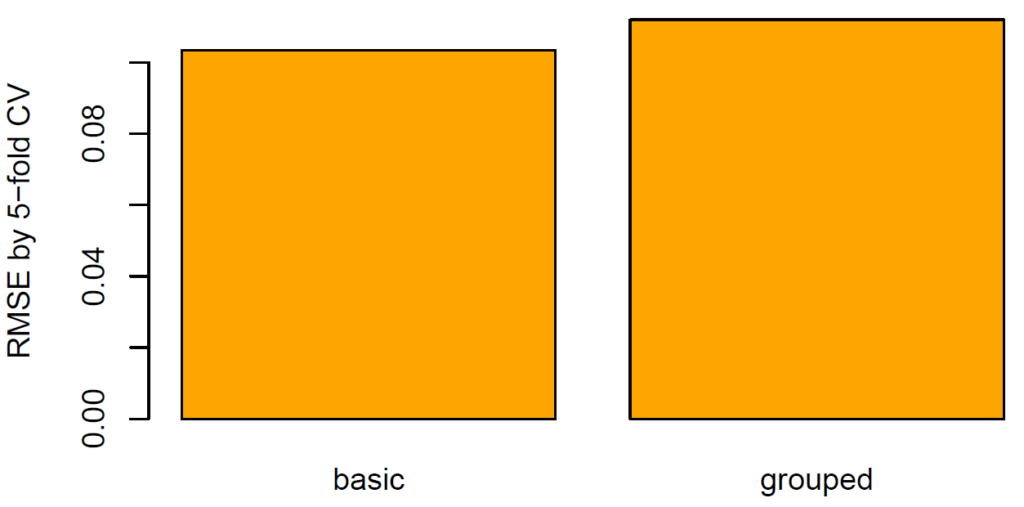
Figure 1: Test root-mean-squared error using different splitting methods (R output).
The RMSE (11%) of grouped CV is 8%-10% higher than of random CV (10%). The standard technique therefore seems to be considerably biased.
Final remarks
The diamonds dataset is not only a brilliant example to demonstrate regression techniques but also a great way to show the importance of a clean validation strategy (in this case: grouped splitting).
Blind or automatic ML would most probably fail to detect non-trivial data structures like in this case and therefore use inappropriate validation strategies. The resulting model would be somewhere between suboptimal and dangerous. Just that nobody would know it!
The first step towards a good model validation strategy is data understanding. This is a mix of knowing the data source, how the data was generated, the meaning of columns and rows, descriptive statistics etc.
This is the next article in our series “Lost in Translation between R and Python”. The aim of this series is to provide high-quality R and Python 3 code to achieve some non-trivial tasks. If you are to learn R, check out the R tab below. Similarly, if you are to learn Python, the Python tab will be your friend.
The last one was a deep dive into historic mortality rates.
No Covid-19, no public data for a change: This post focusses on a real beauty, namely a decomposition of the R-squared in a linear regression model
E(y) = \alpha + \sum_{j = 1}^p x_j \beta_j
fitted by least-squares. If the response y and all p covariables are standardized to variance 1 beforehand, then the R-squared can be obtained as the cross-product of the fitted coefficients and the usual correlations between each covariable and the response:
Two elegant derivations can be found in this answer to the same question, written by the number 1 contributor to crossvalidated: whuber. Look up a couple of his posts – and statistics will suddenly feel super easy and clear.
Direct consequences of the formula are:
If a covariable is uncorrelated with the response, it cannot contribute to the R-squared, i.e. neither improve nor worsen. This is not obvious.
A correlated covariable only improves R-squared if its coefficient is non-zero. Put differently: if the effect of a covariable is already fully covered by the other covariables, it does not improve the R-squared. This is somewhat obvious.
Note that all formulas refer to in-sample calculations.
Since we do not want to bore you with math, we simply demonstrate the result with short R and Python codes based on the famous iris dataset.
R
Python
y <- "Sepal.Width"
x <- c("Sepal.Length", "Petal.Length", "Petal.Width")

# Scaled version of iris
iris2 <- data.frame(scale(iris[c(y, x)]))

# Fit model
fit <- lm(reformulate(x, y), data = iris2)
summary(fit) # multiple R-squared: 0.524
(betas <- coef(fit)[x])
# Sepal.Length Petal.Length  Petal.Width
#    1.1533143   -2.3734841    0.9758767

# Correlations (scaling does not matter here)
(cors <- cor(iris[, y], iris[x]))
# Sepal.Length Petal.Length Petal.Width
#   -0.1175698   -0.4284401  -0.3661259

# The R-squared?
sum(betas * cors) # 0.524
# Import packages
import numpy as np
import pandas as pd
from sklearn import datasets
from sklearn.preprocessing import StandardScaler
from sklearn.linear_model import LinearRegression

# Load data
iris = datasets.load_iris(as_frame=True).data
print("The data:", iris.head(3), sep = "\n")

# Specify response
yvar = "sepal width (cm)"

# Correlations of everyone with response
cors = iris.corrwith(iris[yvar]).drop(yvar)
print("\nCorrelations:", cors, sep = "\n")

# Prepare scaled response and covariables
X = StandardScaler().fit_transform(iris.drop(yvar, axis=1))
y = StandardScaler().fit_transform(iris[[yvar]])

# Fit linear regression
OLS = LinearRegression().fit(X, y)
betas = OLS.coef_[0]
print("\nScaled coefs:", betas, sep = "\n")

# R-squared via scikit-learn: 0.524
print(f"\nUsual R-squared:\t {OLS.score(X, y): .3f}")

# R-squared via decomposition: 0.524
rsquared = betas @ cors.values
print(f"Applying the formula:\t {rsquared: .3f}")
Indeed: the cross-product of coefficients and correlations equals the R-squared of 52%.